Import and export grades with ID numbers using Excel
Import grades: you can upload grades and feedback from an Excel file directly to the "Grader report" on the Moodle course website, either to an existing activity or as a new grade item in the grader report.
* Each student sees only their grades In the Grader report
Export grades: The grader report including the students' ID numbers and usernames can be exported to an Excel file.
What's in this tutorial:
Upload grades from an Excel file
Upload feedback from an Excel file
Export the grader report including ID numbers and usernames to an Excel file
Upload grades from an Excel file
Step A - Preparing the Excel file
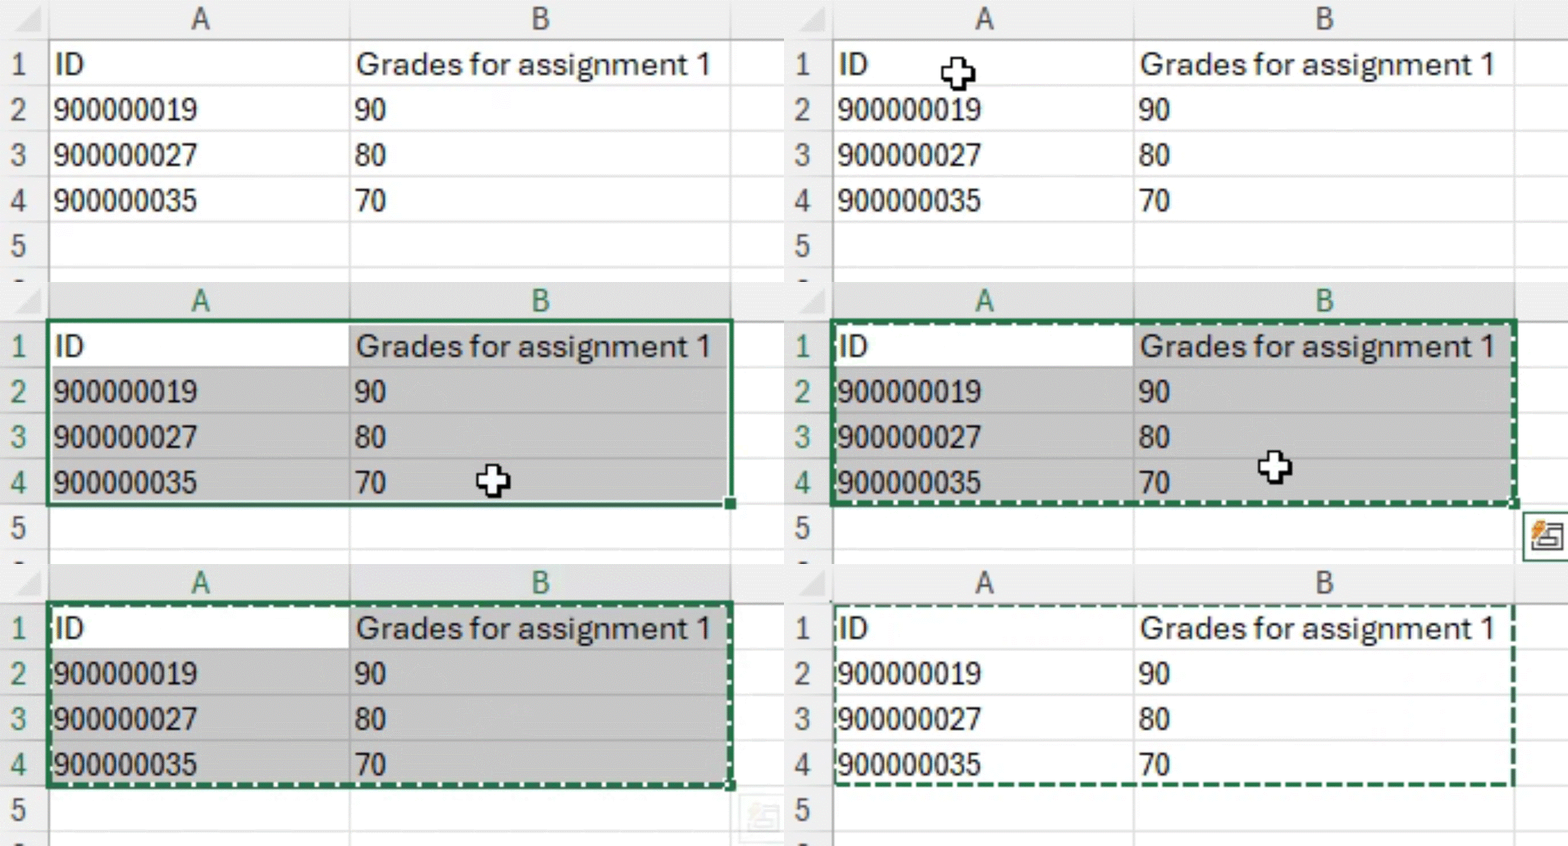
1. Create an Excel file with at least two columns:
-
ID numbers - column title: ID
-
Grades column - column title: the name of the grade item (for example "Assignment 1"). You can create as many grade columns as necessary.
2. Copy the columns from Excel (select the relevant cells -> Ctrl+C)


+
In an activity that uses Scale grading, the scales should be written in English in lowercase letters, for example: pass/fail; submitted/not submitted.

Step B - Upload the grades to the course website
1. On the course website, click "Grades" in the top menu.

2. In the next window, select “Import” in the “Grader report” selectbox on the top left.

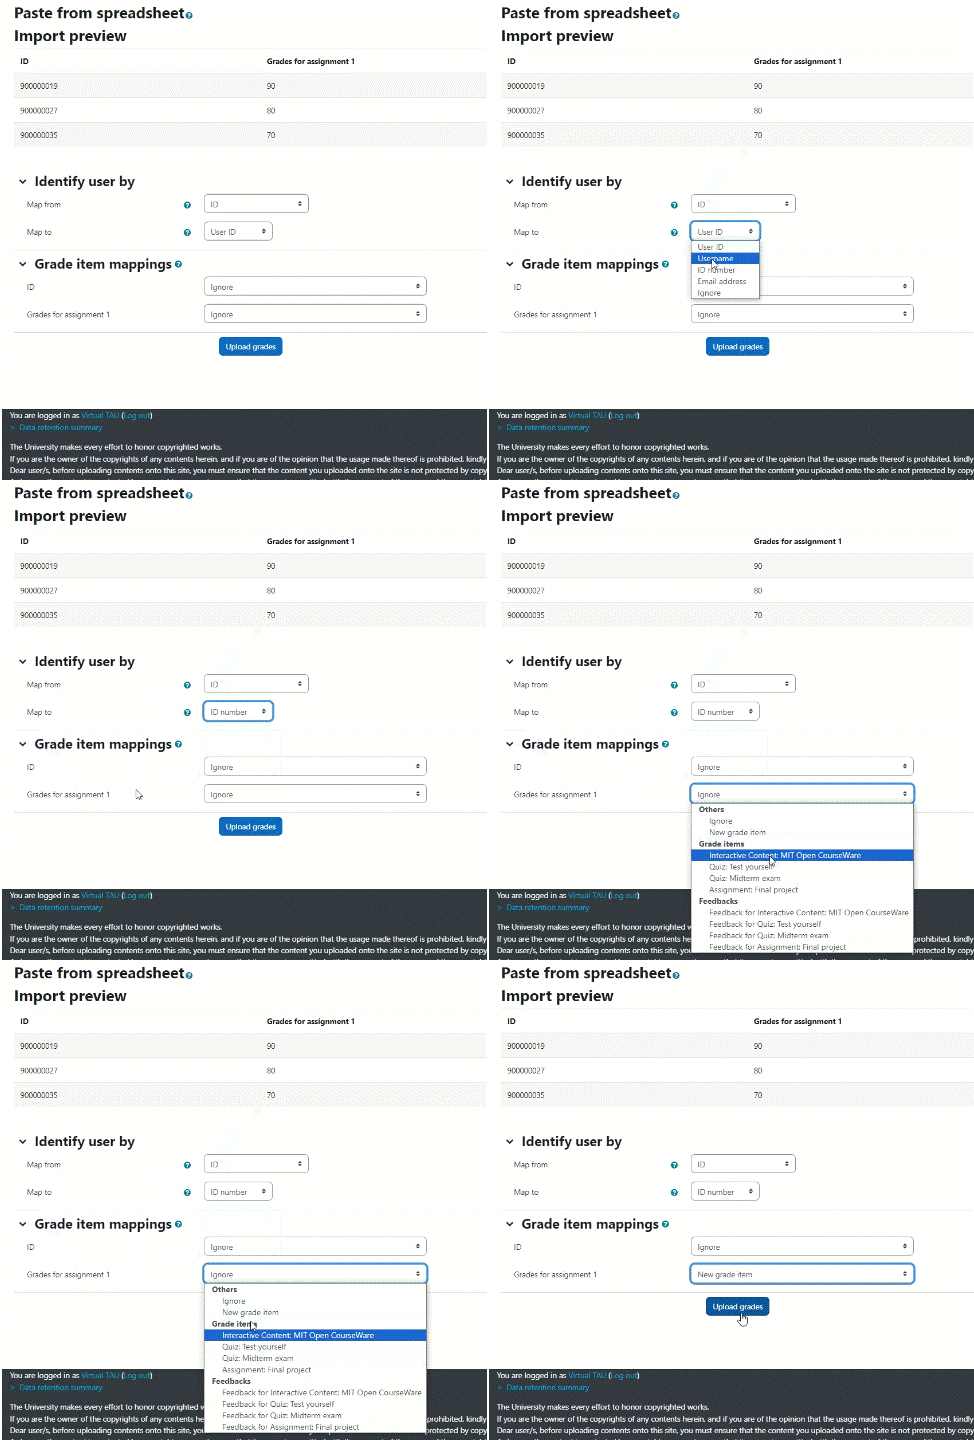
3. In the Data box, paste (Ctrl+V) the Excel data and to finish click on “Upload grades”.

4. On the next page you can preview the 10 first rows uploaded from the Excel file.
On the bottom of this page, several fields must be defined:
Identify user by:
-
“Map from": select the ID columns name
-
"Map to": select "ID number" (make sure to select “ID number” and not “User ID”)
Grade item mappings:
In the ID field, select “Ignore”
In the grade field (as you named in the Excel file):
-
To create a new item in the grader report - select “New grade item”
-
To upload the grades for an existing item, select the item from the dropdown menu.
5. Click on the "Upgrade grades" button.

6. A confirmation message “Grade import success” will appear - click on “Continue”.

7. Now you can see grades in the Grader Report
-
If you uploaded grades to an existing item, you will see the grades in the item column, with orange background (indicating that manual changes were made to the item grades).
-
If you uploaded grades as “New grade item” – the new item will be created with the name from the Excel file.
Uploading grades for several grade items at once
To upload grades to several grade items at once, prepare the file in the same way and add grade columns as needed, make sure to give different names to each grade column.
In the "Grade item mappings" stage - select for each column its grade item (if existing or new).
Upload grades and feedback from an Excel file
Note: feedback can only be uploaded to a grade item that already exists in the grader report (such as, assignment, quiz, grade item etc.).
Step A - Preparing the Excel file
1. Create an Excel file with three columns:
-
ID column - column title: ID
-
Grades column - the column title: the name of the grade item (for example "Assignment 1")
-
feedback column - column title: feedback + the name of the item (for example "Feedback Assignment 1")
2. Copy the columns from Excel (select the relevant cells -> Ctrl+c)


+
In an activity that uses Scale grading, the scales should be written in English in lowercase letters, for example: pass/fail; submitted/not submitted

Step B - uploading the grades to the course website
1. On the course website, click "Grades" in the top menu.

2. In the next window, select “Import” in the “Grader report” selectbox on the top left.

3. In the Data box, paste (Ctrl+V) the Excel columns and click on “Upload grades”.

4. On the next page you can preview the 10 first rows uploaded from the Excel file
On this page, several fields must be defined:
Identify user by:
-
“Map from": select the ID columns name
-
"Map to": select "ID number" (make sure to select “ID number” and not “User ID”)
Grade item mappings:
Note: the “Grade item mappings” dropdown menu is divided into two sections: “Grades items” and “Feedbacks”
-
In the ID field, select “Ignore”
-
In the grade field (as you named in the Excel file) "Assignment grade 1" select the relevant item in the “Grades items” section.
-
In the feedback field (as you named in the Excel file) "Feedback Assignment 1" select the relevant item in the “feedbacks” section.
5. To finish, click on the "Upgrade grades" button.

6. A confirmation message “Grade import success” will appear - click on “Continue”.

Now you can see grades in the grader report.
To see the grades and the feedback:
-
Select “Single view” in the “Grader report” dropdown menu on the top left.
-
Click “Grades Item” and then select the grade item in the field "Select a grade item".

Exporting the grader report with ID numbers and usernames to an Excel file
1. On the course website, click "Grades" in the top menu.

2. In the next window, select “Export” in the “Grader report” selectbox on the top left.

3. Check the grade items you wish to export (click on "all" or "none" if you want to mark or unmark all the items at once). To finish, click on "Download".
