Communication Tools
Forum
Forum is an asynchronous activity where one can conduct a discussion on a specific topic in the course. Examples of forum use: "Virtual Reception Hours", "Q&A forum" and more.
In the forum, all participants can see the messages of all participants and respond to each other, unless “visible groups” or “separate groups” have been defined in the settings.
Forums can be used for collaborative learning, class dialogue, peer evaluation and discussion.
Building a forum
2. Select a topic, click on then select "Activity or resource".

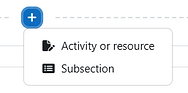
1. Turn on Edit mode
3. Choose “Forum”

4. Write the “Forum name”.
5. In the “Description” field, it is possible to type in instructions for the activity, or an introduction to the topic at hand.

6. Choose Forum type “standard forum for general use” (default) - where all participants can see all messages, write, and respond to each other. For explanations on additional forum types, click on the question mark icon in the "forum type" definition.

7. In the "Subscription and tracking" section, choose the way the students subscribe to the forum. That is, if the students will receive the forum messages also to their email automatically.

8. To finish, click on “Save and display”.
Starting a discussion
1. Click on the “Add discussion topic” button to start the discussion.

2. Write the forum title in the “Subject” section.
3. The content of the question/answer must be written in the “Message” section.

4. If you mark the option “send forum post notifications with no editing-time delay”, an email will be sent immediately after the message is created in the forum, instead of the default which is a delay of five minutes for editing.
5. To finish, click “post to forum”.

If you didn't mark the “send forum post notifications with no editing-time delay”, you will have five minutes to edit the message after posting it. To edit it, first click on the message in the discussion list.

Next, click on the "Edit" button under the text to open the text editor.

Commenting on a discussion
1. Click on the discussion title under the “Discussion” section in the table.

2. To reply to a discussion, click on "Reply". After writing your comment, click on "Post to forum" to finish.

3. Your comment will show on the bottom of the discussion thread, under the post you replied to.

Guests on the course can only view the content of the discussion, without the possibility of commenting.
Lecturer Messages
All messages sent from the "Lecturer Messages" are automatically sent to the students' emails and appear on the course website and the students' home page.
The messages that are sent help in keeping in touch with the students regarding teaching and learning in the course and provide updates and instructions.
The "Lecturer Messages" activity is named "Announcements" in some courses
Sending messages to all students
1. Enter the course website.
2. Make sure that the course website is available for students. For a guide explaining how to make the site available, refer to this guide.
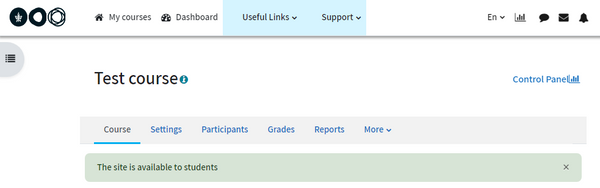
3. Click on the “Lecturer Messages” item.
4. Click on the “Add discussion topic” button to start the discussion.

5. Write the forum title in the “Subject” section.
6. The content of the question/answer must be written in the “Message” section. You can add different media options and links to the text. You can also add files by dragging them to the text editor.

7. If you mark the option “send forum post notifications with no editing-time delay”, an email will be sent immediately after the message is created in the forum, instead of the default which is a delay of five minutes for editing.
8. To finish, click “post to forum”.

Sending messages to specific groups
1. Enter the "Lecturer Messages" forum, then click on "Settings" in the menu at the top of the page.

2. Enter the "Common module settings" section. In the "Group Mode" field, choose the "Separate Groups" option.

3. In the "Grouping” field choose the "Iron Swords groups” option, for example.

4. To save your changes, click on "Save and return to the course”.
5. Go to the "Lecturer Messages" forum on the course website.
6. On the upper right side, select in the drop-down list to whom you would like to direct the message (all participants or a specific group).
If you haven't created the groups yet, refer to the 'Creating groups' guide.

7. Now you can click on the "Add discussion topic" button, write a message and click “Post to forum”.
Forum NG
This forum enables personal communication between the lecturer and students:
-
Only the lecturer and teaching staff can see the students' messages
-
Each student sees only their private correspondence with the lecturer
Building a forum
2. Select a topic, click on then select "Activity or resource".
1. Turn on Edit mode
3. Choose “ForumNG”.
4. In the settings:
-
Give the forum a name
-
Choose the type of forum (general use or for lecturer-student interaction)
-
If applicable, add description and introduction
-
Choose who can sign-up for email subscription updates


If this option is ticked, the forum will automatically create a discussion per student
5. In the "Limit posts" section, the instructor can choose:
A. A specific time for students to post and reply
B. Whether or not to limit the number of discussions and replies per student
C. Whether students can add new discussions

A
A
B
C
6. To finish, click "Save and display".

Using the forum
1. This is what the Forum looks like from a student's perspective:

2. After students start discussions, this is what the Forum would look like from the instructor's perspective:

Click on the to mark the post as "read"
The buttons underneath the forums table include:
All posts will be marked as "read"
A breakdown of the number of discussions and replies by student

A breakdown of the forum's usage by students, including:
-
Most posts
-
Most discussions
-
Number of subscribers
-
Most read discussions
-
Most flagged posts/discussions
Locks discussion, along with a message from the instructor. The discussion will not appear in the list of forums.

Promotes a discussion at the top of the table

3. Click "Reply" to respond to a student's post.

The conversation would then look like this:
