Content Resources
In Moodle, you can add and design different types of content that are embedded directly within the course website, such as text, formulas, images, sound (audio) and videos (video) - without the need to download a separate file.
The resources detailed in this guide have several advantages:
-
Open directly on the course website so there is no need to download a separate file (e.g. Word)
-
Convenient for students to view on a mobile device
-
Changes can be updated directly on the page (rather than changing the files and uploading them again)
-
Link the text to the glossary activity of the course website
-
Add external links
What's in the guide:
Text and media area (Label)
Text and media area (Label) allows you to add text and media to the course page:
Add a secondary title to the topic
-
Add instructions and explanations on the course page
-
Add links on the course page
-
Add a variety of media
Adding a Text and media area (Label) to the course website
1. Turn on Edit mode
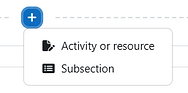
3. Choose “Text and media area (Label)”

2. Select a topic, click on then select "Activity or resource".

4. In the Settings page, you can add and edit content using the text editor. Clicking on the displays additional buttons.

Adding a secondary title
A secondary title allows division into subtopics within a certain topic/section
1. Write the subtitle in the text box

2. Select the text.
3. In the toolbar that appears, select "H3".

4. To add the title and save, click on "Save and return to the course" at the bottom of the screen.

The secondary title will appear within the subject on the course page:

For additional options for adding media and text with the text editor, click here.
Page
The resource "Page" makes it possible to prepare an informative page that is embedded directly within the course website without the need to download a separate file. You can design the page, add text, images, sound (audio) and videos (video).
A page has several advantages:
-
Opened directly on the course website so there is no need to download a separate file (e.g. Word)
-
Convenient for students to view on a mobile device
-
Changes can be updated directly on the page (rather than changing the files and uploading them again)
-
The text can be linked to the glossary of the course website
-
You can add links
1. Turn on Edit mode
3. Choose “Page”
2. Select a topic, click on then select "Activity or resource".
4. Write the title of the page in the "Name" field and add a description.

5. Mark "V" in the field "Display description on course page", so that the description will be displayed on the main page of the course.
6. Write and format the text in the "Page content" box.

7. To finish, click on "Save and return to course" at the bottom of the screen.

For additional options for adding media and text with the text editor, click here.
Book
A book allows the creation of learning material consisting of a large number of pages containing text, images, videos and other multimedia elements, which amount to a book with chapters and sub-chapters.
What's in the guide:
1. Turn on Edit mode
3. Choose “Book”
2. Select a topic, click on then select "Activity or resource".
4. Write the title of the book in the "Name" field. You may add a description as well.
5. Mark in the field "Display description on course page", so that the description will be displayed on the main page of the course.

6. Choose whether the chapters and sub-chapters are organized numerically, using bullets, indentation or without arrangement.

None

Numbers

Bullets

Indented

7. Check the "Custom titles" section if you want the titles not to be displayed automatically in each chapter.

Custom titles - Checked

Custom titles - Unchecked

8. To finish, click on "Save and display".
Adding chapters to Book resource
1. Enter the Book you have created.
In the window that opens, add a title to the chapter in the section "Chapter title" and "Content" to the first chapter.

For additional options for adding media and text with the text editor, click here.
2. Mark if the topic is a "Subchapter". Subchapters can only be created if there is at least one chapter.
To finish, click on "Save Changes".

Editing the book chapters
1. When editing is enabled, clicking on the icons in the table of contents allows you to edit, hide or delete the chapter, as well as add additional chapters.
Move chapter
Edit chapter
Delete chapter
Show/hide chapter
Add chapter
2. After adding another chapter, it is possible to navigate between the chapters of the book using the arrows.

Importing and exporting
You can import a Word file for a chapter in a book as well as export one chapter or the entire book.
1. Create a Word file with Headings, chapters will be created in the book according to the title level. For example, "Heading 1" will be a main chapter and "Heading 2" will be a subsection.

2. To import, go to the Book and click on "Import from Word" in the management bar

3. To upload, select the file from your computer and drag it, then click on "Import"

4. To finish, click "Continue"

Students using the Book resource
Besides viewing and reading the contents of the book, the students can also print the book or specific chapters.

They can move from chapter to chapter in the book either by using the table of contents in the box on the right, or by using the arrows located at the top of each chapter.

Tab Display
Tab Display allows the creation of a collection of content pages and their presentation as a single page divided into sections, which are essentially tabs.
The advantages of a styled content page also apply to tabs.
Additional benefits include:
-
Organizing information by chapters, units, or stages
-
Consolidating the topic into one place within the course website, without needing to download the content
-
Adding various media resources, such as videos, links, embedded websites, images, and GIFs
1. Turn on Edit mode
3. Choose “Tab Display”
4. In the "Name" field, enter the title of the page.
5. A description, instructions or an explanation of the tabs can be added in the "Description" field.

6. Enter the details of the first tab:

Title of tab
Content of tab, including:
-
Images
-
Videos
-
Links
-
Text
Order of tab
Embed a web page in the tab - the webpage will fill the tab
New tab
2. Select a topic, click on then select "Activity or resource".
7. When finished adding tabs, click on "Save and display".
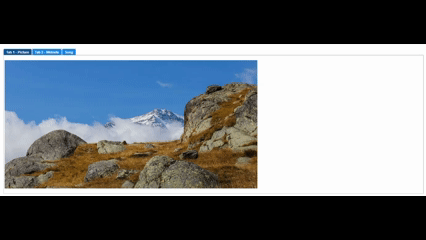
After adding more tabs, the tab display should look like this:
8. To edit the tabs, click on "Settings":

9. To delete a tab, empty all of the content that was added (Name, content, webpage..)