Tasks Board - Kanban
The Task Board activity can enhance the productivity and efficiency of the learning process by managing tasks for course participants, encouraging collaboration and teamwork.
Kanban (看板), meaning "notice board" or "sign" in Japanese, includes two main components:
-
Cards, representing tasks
-
Columns, representing tasks at different stages or in different areas of a project
Common usage: Columns indicating task status: “To Do”, “In Progress”, “Done”; and cards representing tasks to be completed. As tasks progress, cards are moved between columns on the board to reflect their current status in the learning process.
What’s in this guide?

Tasks Board can be used to foster engaged and collaborative learning, and learning management.
Adding a Kanban to the course site
1. Turn on Edit mode.
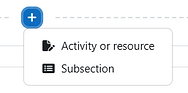
2. Choose a topic, click on and choose “Activity or resource”.
3. Choose “Tasks Board - Kanban”.
4. In the "Choice name" field, enter the name of the Kanban - the deafult
5. The instruction for using the Kanban can be added in the "Description" field.
6. Check the box "Display instructions on the course main page" so that the instructions appear on the course homepage.


7. Choose which types of boards are available for students:

-
Shared board + individual board for each student.
-
Instructors have access to all boards.

Shared board for all students
-
Each student has a private board.
-
Instructors have access to all boards.
8. When finished, click "Save and display".
Editing Columns
This is the default layout of Kanban:

1. Click the on the right side to delete, lock (prevent editing existing columns) or edit the column.

2. Move the cursor between the columns; click on the line and to add a column.

3. Hover the cursor over a column, until it change into a . Drag and drop the column to its new placement.

4. To rename a column, double-click on its name and type a new one.
Editing Cards
Adding a new card
To add a new card, move the cursor under the column's title, and click on .

Renaming a card
To rename a card, double-click on its title and add a new name.
Editing a card
To edit a card, click on next to the name of the card:

Assign yourself as responsible for the card
Delete the card
Start a discussion about the card
Display the card in all columns
Edit the card
Mark card as complete
Move the card to another column / after another card
1. Click "Edit" to edit the card.
2. In the editing window, you may change the title of the card, assign students to be responsible for the card, and add a general description of the card.


3. In addition, you can assign a due date for the completion of the card, as well as a reminder. Files can also be added to the card, and its background color can be changed.


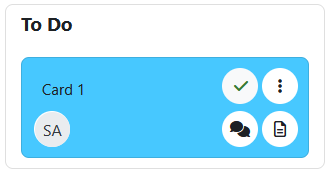
4. This is what a finished card looks like:

Card title
Due date
Assigned student
Show description, including files
Starting a discussion
1. Click on next to the name of the card and choose "Start discussion".

2. Type the first message in the discussion, and click :

3. As a teacher, you will be able to delete comments:

4. On the card, a new "Discussion" icon will appear:

Moving a card
1. Click on next to the name of the card and choose "Move".

2. A new window will open to set the card's new placement:


Marking a card as "complete"
1. Click on next to the name of the card and choose "Complete".

2. On the card, a checkmark will appear.
What can students do on a Tasks Board?
-
Editing columns: Students cannot edit columns (i.e., they cannot change column names, add, delete, etc.).
-
Adding and editing cards: Students can add and edit cards as needed. They can change the position, add files, update texts, colors, mark completion, and so on.
-
Assigning cards: Students can assign a card to themselves only. They cannot assign a card to another student, but all students have the option to assign the same task card to themselves.
-
Switching between boards: Each student can view only their personal board and the shared board (if defined). Students cannot switch between other students' boards.
Switching to a student's board
If the personal type of board is chosen, each participant will get their own Tasks Board. For example:

As a teacher, you can easily browse the participants' personal boards.
1. Click on next to the name of the board and choose "Change user board".

2. In the "Change user board" window that opens, select the participant whose Tasks Board you want to access.
