Assignment - Grades & Feedback
In an Assignment activity, a grade can be set based on a marking guide, a rubric, or a criteria scale that the lecturer creates in advance. These methods show evaluation criteria and the relative weight of each criterion within the overall grade.
Using a predefined guide, rubric, or scale can clarify the expectations in the assignment for the students. Also, the guide/rubric/scale ensures greater reliability in grading when different graders are involved.
It is advisable to make the marking guide, rubric, or criteria scale available to the students in advance to promote submissions more in line with the lecturer expectations.
There are three methods of advanced grading in Moodle:


Marking Guide
Rubric
Criteria Scale
Defining evaluation criteria
Setting a maximum score for each criterion
Providing comments for each criterion
Giving general feedback
Defining evaluation criteria
Assigning a weight to each criterion
Defining a grading scale
A different scale for each criterion
Providing comments for each criterion
Giving general feedback
Defining evaluation criteria Assigning a weight to each criterion
Defining a grading scale for each criterion
A different scale for each criterion
Providing comments for each criterion
Giving general feedback
What's in this guide:
-
Advanced grading
-
Downloading and uploading assignments
-
Making grades available
Creating a marking guide in an assignment
1. On the course site, enter the relevant Assignment.
If you have not yet created the assignment, click here for instructions for creating an Assignment.
2. In the assignment item, click on "Advanced grading" in the top menu
3. On the “Change active grading method to” field, select "Marking guide" and click on the "Define new grading form from scratch" button.

4. On the next page, name the marking guide.
It is possible to add general information or a description in the "Description" field.

5. Define the first criterion:
-
Criterion name, for example: Introduction chapter
-
Description for students: You can write description or instruction for the students, for example: "In the Introduction chapter you need to define the issue being examined, explain its importance and set the goals of the research."
-
Description for Markers: You can write an instruction for the evaluators, for example: "note that all the required information is clearly written... Add points for… Deduct grade for..."
-
Maximum score: Set the maximum grade (points) for this criterion.

6. Additional criteria can be added as needed by clicking "Add criterion".

7. In the “Marking guide options” section, you can define whether the grading criteria will be available to students and whether they will see the grade for each criteria.

8. To finish, click “Save marking guide and make it ready” button
Grading an assignment using a marking guide
1. Enter the Assignment and click on "Submissions".

2. Choose a student's assignment, click on and select "Grade".

3. On the submission page you can see the submission file on the left side and the submission details on the right side. You can navigate between the pages using the arrows in the upper left corner.
Navigate between pages

Submission details
4. On the right, in the "Grade" section you can grade and add comments for each criterion you created.
To enlarge the marking guide click on the square icon in the corner:

5. The total grade will be calculated automatically.
To finish, click on "Save changes" at the bottom of the screen or click on "Save and show next" to go to the next student.
Note: you can change the page layout to your convenience with the buttons in the lower right corner
Creating a rubric for an assignment
1. On the course site, enter the relevant Assignment
If you have not yet created the assignment, click here for instructions for creating an Assignment.
2. In the assignment, click on "Advanced grading" in the top menu
3. On the “Change active grading method to” field, select "rubric" and click the "Define new grading form from scratch" button

4. On the next page, name the rubric. It is possible to add general information/description in the "Description" field.
5. Set the rubric criteria:
Set the levels' names and points
Name and describe the criterion

Add levels to the rubric
Delete criterion
Duplicate criterion
Add additional criteria
5. By default, all of the rubric options are selected.

6. To finish click the “Save scale and make it ready” button,

Grading an assignment using a rubric
1. Enter the Assignment and click on "Submissions".
2. Choose a student's assignment, click on and select "Grade".
3. On the submission page you can see the submission file on the left side and the submission details on the right side. You can navigate between the pages using the arrows in the upper left corner.
Navigate between pages

Submission details
4. On the right, in the "Grade" section you can select the level that matches the student's work, and add comments for each criterion you created.

5. Afterwards, you can also provide written feedback through comments or files.
6. To finish, click on "Save changes" at the bottom of the screen or click on "Save and show next" to go to the next student.
After saving, the total grade will be calculated automatically and added to the gradebook.


Note: you can change the page layout to your convenience with the buttons in the lower left corner
Creating a criteria scale for an assignment
1. On the course site, enter the relevant Assignment
If you have not yet created the assignment, click here for instructions for creating an Assignment.
2. In the assignment, click on "Advanced grading" in the top menu
3. On the “Change active grading method to” field, select "Criteria scale" and click the "Define new grading form from scratch" button

4. On the next page, name the rubric. It is possible to add general information/description in the "Description" field.
5. Set the criteria:
Enter the percentage of the criterion (10, 25..)
Name the criterion (for example, "Ideas" or "Evidence")

Add additional criteria
Set equal percentages for all criteria
For example:

All criteria must add up to 100%
5. Set the rating scale:

Choose the number of levels
For example, after choosing 4 levels, the following fields appear:

Delete levels
Provide a description for each level
Enter the value each level - from the lowest (0) to the highest (1)
For example:

It is also possible to add levels, and automatically re-calculate the weights. It is also possible to hide or make it visible for students to see the criteria scale and weights by ticking ( ) the relevant options.

7. To finish click the “Save scale and make it ready” button,


Grading an assignment using a criteria scale
1. Enter the Assignment and click on "Submissions".
2. Choose a student's assignment, click on and select "Grade".
3. On the submission page you can see the submission file on the left side and the submission details on the right side. You can navigate between the pages using the arrows in the upper left corner.
Navigate between pages

Submission details
4. On the right, in the "Grade" section you can grade and add comments for each criterion you created. Click on the scale square to select it. To enlarge the marking guide click on the arrow icon in the corner.

5. Afterwards, you can also provide written feedback through comments or files.
6. To finish, click on "Save changes" at the bottom of the screen or click on "Save and show next" to go to the next student.
After saving, the total grade will be calculated automatically and added to the gradebook.

Note: you can change the page layout to your convenience with the buttons in the lower left corner
Uploading assignment grades through Excel
1. Enter the assignment and click the "View All Submissions" button.

2. Assignment grades can be uploaded via an Excel spreadsheet. First, download the assignment grade sheet, enter the grades according to student names, and upload the file back to the assignment.
To download the grade sheet to your computer, click on "Actions", open the dropdown menu, and select "Download grading worksheet".
-
This can be done even if some grades have already been entered.
-
Grades cannot be entered by ID number, only by student names.


3. In the Excel sheet, you can manually fill in missing grades as needed. Enter the student grades in the "Grades" column and save the file.

4. To upload the Excel sheet back to the assignment:
Select "Upload grading worksheet" from the same dropdown menu as in Step 2:
5. Drag the Excel file into the dotted field or upload it via "Choose a file".

6. After adding the file, click the "Upload grading worksheet" button.

7. Click "Confirm" in the confirmation window.

8. Finally, click "Continue".

Uploading graded assignments back to Moodle
To read the guide for downloading assignments and grading them on your personal computer, click here.
1. Ensure all the reviewed assignments in the folder are with their original file names, and save them as a new ZIP file.
To do that, right-click on the folder, select "Compress to...", and then "ZIP file".


2. On the course site, enter the assignment and click on "View All Submissions".

3. On the submissions page, click on "Actions", and select "Upload feedback files in a zip" from the dropdown menu.


4. Drag the ZIP file into the upload area and click "Import feedback file(s)" to complete the upload.

5. Click "Confirm" to upload the ZIP file, then click "Continue" to finish the feedback upload process.


6. Click on "Submissions", and confirm the uploaded feedback files are in the "Feedback Files" column.

Revealing the assignment grades to students after an anonymous check
1. After checking the assignments and in order to reveal the grades to the students, click on the "More" button in the top menu, and then on "Reveal student identities".

2. In the pop-up window, click on "Continue" to complete and confirm the action.

The grades will not be available to the students without revealing the identities
3. After that, click on "Please note, grades and feedback are not available to students. Click to make available".

4. In the next page, choose whether to send a notification to students.
If so, whether to send a message to all students or only to students who received a grade/feedback.
To finish, click "OK".

Updating students about grades and feedback
After grades are made available to students, students can be notified that their assignment has been reviewed and given a grade/feedback, in two ways:
Option 1: On the assignment grading page, mark with a V whether to send a message to a specific student whose work was graded.
From the student's point of view, this is what the email will look like:

Option 2: Make grades available to students. On the Assignment page, choose whether to send a message to all students or only to those to whom you have given a grade and/or feedback.

And from the student's point of view, this is what the received email will look like:

Students seeing grades and feedback
Students must click on the assignment item to open a page with their submission details, grade, feedback, checked file, etc.
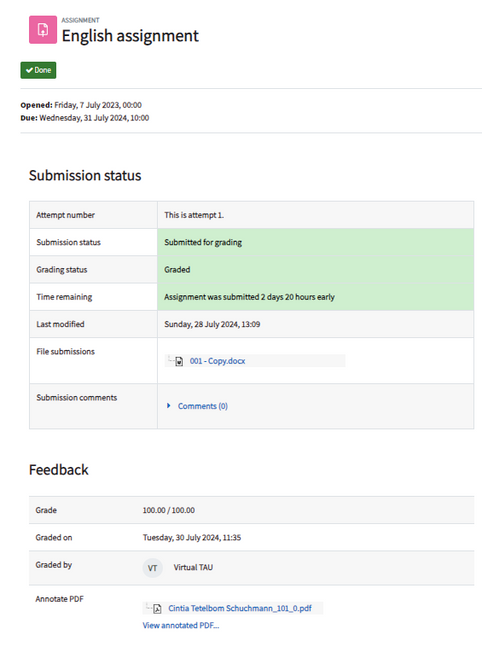
The students can download the feedback as a file to the personal computer, and if a message appears "View annotated PDF..." it is possible to click on the link and view the content of the feedback online.