Board
Board is a collaborative tool that allows students and lecturers to add text, links, images, and videos.
The participants in the activity can rate the notes and even change the positions of the notes according to the goals of the activity/discussion.
1. Turn on Edit mode
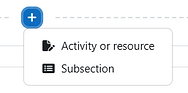
2. Choose a topic, click on and choose “Activity or resource”
3. Choose the “Board” resource.
4. When setting up the resource, name the Board and, if relevant, add a description.

6. Choose:
-
whether the rating of posts is disabled or whether posts can be rated and by whom.
-
whether the sorting of posts is disabled, by date, or by rating.
5. Set the board's background color using HTML code, or upload an image.


7. Choose the board's user mode:


Edited by:
-
All students
-
Teacher
Seen by:
-
All students
-
Teacher
Comments by:
-
All students
-
Teacher
8. Enable the relevant settings:

Links open in a new window
The name of the board does not appear when the board is embedded.

9. It is possible to give specific conditions for the completion of the activity, including a required number of posts. To enable it, select "Add requirements" and check next to "Required notes" and set a number of required posts.
9. Click "Save and display".
Teachers can also set a reminder for students to write posts before a certain dates.
When a teacher chooses to create either a Private or a Public board, the columns they create will remain the same for each student.

However, by selecting specific users, the teacher can add different posts for different users.
1. The board by default arrives with three columns.
Create a new column

Add a new post to the column
Lock column
Move column
Delete column

2. Give the post a title and add the content. Only one type of media can be added: links, images, and YouTube videos:


3. When finished, click .
4. This is the board from the teacher's view. Each column can be locked, moved or deleted, as well as editing tools for posts:

Rate post
Delete post
Move post
Edit post
This is the board from a student's view. Posts can only be rated; when clicked on, other students and the teacher can post comments.

1. After clicking on a post, there will be a "Comments" section underneath the post. Add a comment by clicking on "Add comment", along with a gallery of emojis. When finished, click .

2. Teachers can delete comments by clicking on the icon.

3. To rate a post, click on .

4. A confirmation message will appear:

5. The rating counter updates with every rating:

Posts can be sorted by their number of rankings.