Quiz
Do not duplicate a Quiz
Question Bank
Creating a category in the Question Bank
The questions in the Course question bank can be divided according to different categories (for example, divided into subjects/degrees of difficulty/time). Below are instructions for creating a new question category.
1. Enter the course website.
2. Click on "More" in the course's top menu. Then, click on "Course question bank".
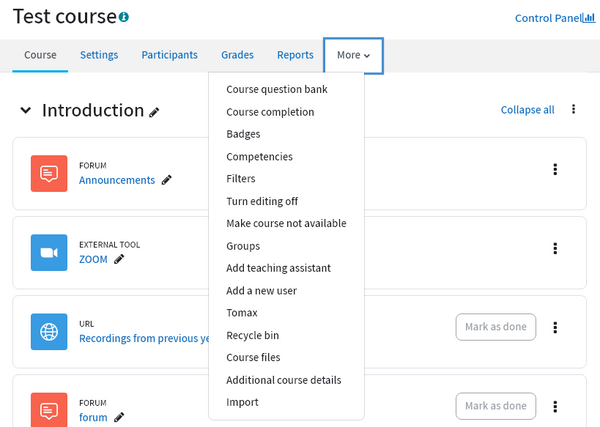
3. In the dropdown menu, choose "Categories".

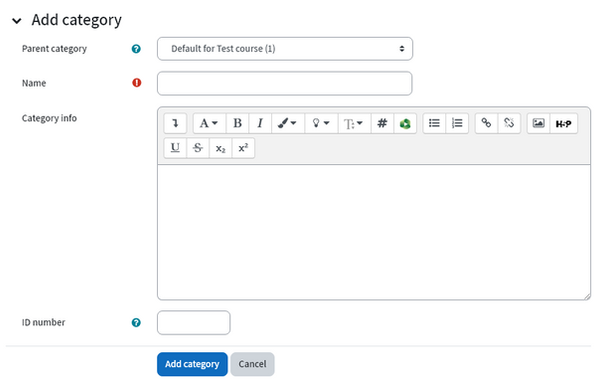
4. In the page that opens, click on "Add category".

5. In the section "Parent category", select the parent category.
In the "Name" field, enter a title for the new category.
To save, click on the "Add Category" button at the bottom of the screen.
Moving a question to a different category
1. Enter the "Course question bank" and check V on the checkbox next to the relevant question or questions. At the bottom of the page, click on "With selected", and then "Move to...".

2. In the page that opens, select the category in the dropdown menu, and then click on the "Move to" button.

Updating a question in the course question bank will change the question in all quizzes. Therefore, it is advisable to create a category and questions for each quiz separately.
How to create a question in the Course question bank?
1. Enter the course website.
2. Click on "More" in the in the course's top menu. Then, click on "Course question bank".

3. In the page that opens, select a category and then click on "Create a new question...".

4. Click on the type of question that you would like to add and click on "Add".

You can find a detailed explanation on the main question types available in Moodle.org. Click here to access it.
How to create a rubric for grading essay questions?
An essay question is checked manually. If the grading is divided between the teaching staff, it is recommended to build a rubric to make the process more efficient and coherent between the different graders.
1. Choose "Essay" as the question type and click on "Add".

2. Type in the name of the question, the content of the question, and the response options.
If there is a template to be followed by the students, define it in the "Response Template" field.
* These instructions will be visible to students on the response input box.

3. You can enter the rubric for the quiz and the instructions for the graders of the essay question in the field "Information for graders".
* These instructions will be visible to those with teaching faculty permission in the course only.
4. To finish, click "Save changes".

Create the Quiz activity
It is recommended to create each Quiz separately and not duplicate.
If a question from the Course question bank is changed in a duplicated quiz, the question will also be changed in the original quiz, even if the original quiz has already ended and has been graded.
1. Turn on Edit mode
2. Choose a topic, click on and choose “Activity or resource”
3. Choose “Quiz”.


4. In the "Name" field, type in the name of the quiz.
5. in the "Description" field, you can add opening instructions.
Check V in the checkbox "Display description on the course page" so the instructions will appear on course website, even before entering the quiz.

6. You can set whether to send a submission confirmation email to the student.
When set to "yes", (active mode) a submission confirmation email will be sent to students upon exam submission - Recommended for graded exams
When set to "no" – no submission confirmations will be sent - Recommended in practice mode (not for grading), where students take the exam a few times for practice.

Timing section
1. In the section "Open the quiz", check V in "Enable" and choose the date and time of the start of the quiz.
2. In the section "Close the quiz", check V in "Enable" and choose the date and time of the end of the quiz.

Day
Month
Year
Hour
Minute
3. In the "Time Limit" section, you can determine the duration of the exam from the moment the students begin. Check V in the "Enable" and type in the number of weeks/days/hours/minutes/seconds allocated for the exam.

Example:
-
On "Open the quiz" the start time was set for 14:00
-
On "Close the quiz" the end time was set for 15:00
-
On "Time limit" it was set for 15 minutes
The students will be able to take the quiz in the defined time range (14:00-15:00), but from the moment they start answering the test, they will have fifteen minutes to complete it, else it closes automatically.
In this example, if the student started the quiz at 14:55, they will have 5 minutes to complete the exam (the end time overrides the time limit).
Grade section
You can define the number of attempts the students are allowed when answering the quiz.

Layout section
1. In the "New page" field, you can define if the questions will all appear on one single page or define how many questions will appear on each page.
2. By clicking on "Show more", in "Navigation method" you can select "Free" or "Sequential".
Select "Free" to allow students to navigate freely between the questions during the quiz. That is, even if they have answered a question and moved on, they will be able to go back at any time until the test is closed.
Select "Sequential" if you want the students to navigate according to the order of the pages and questions.

When the quiz includes many questions, it is recommended to divide the questions into several pages. Click here to learn how to edit the quiz pages.
If it is a small number of questions (10-15 questions), it is recommended to present each question on a separate page.
Question behaviour section
To randomly mix the order of the question choices, you can set the section "Shuffle within questions" as "Yes". In this situation, if you define in a certain question that choices will not be mixed, only in that question will the choices remain in their order.
If you define "No" in the above section, the choices will never be mixed, even if a certain question was defined differently.

Review options section
1. You can define what the students will see and when.
In the quiz it is advisable not to allow automatic feedback at all.
Please note: in the upper left corner, the option "The attempt" in the column "During the attempt" - is permanently marked.

During the attempt
The students will be able to see what they chose during the answer to the test (in real time).
Immediately after the attempt
The feedback will appear to the students immediately after the submission (after clicking "Submit all and finish" and until they exit the exam).

Later, while the quiz is still open
The feedback will appear to students from the moment of submission until the Quiz is officially closed.
For example: if a student submitted at 14:55 and the test closed at 15:00, the student can log out and log in to view the feedback, until 15:00.
After the quiz is closed
The students will be able to see the feedback only after the closing date of the Quiz, without limitation.
For example:
if the test closes at 3:00 p.m., the students will be able to see the feedback starting at 3:00 p.m. and without a time limit as long as the settings have not been changed.
-
"The attempt" - Shows all the questions (including choices) in the quiz and how the student responded to each question.
-
"Whether correct" - Displays whether the students response to each question is correct, partially correct, or incorrect.
-
"Marks" - Shows the numerical grade for each question and the grades awarded to the student.
-
"Specific feedback" - Shows the feedback for the response to the answer as set when adding the question. Each response to a question can have feedback for both correct and incorrect answers.
-
"General feedback" - Displays the general feedback for the whole question as set when adding the question to the quiz. You can use the general feedback to give students some background to what knowledge the question was testing.
-
"Right answer" - Reveals the correct answer to each question, even if the student answered incorrectly.
-
"Overall feedback" - Displays feedback for the entire quiz depending on the student's grade, as set in the quiz settings.
2. To save, click on "Save and display".
Add questions to the Quiz
How to add questions to the quiz?
A. Add questions from one of the categories in the question bank
B. Add a random question from a category
A. Add questions from a category in the question bank
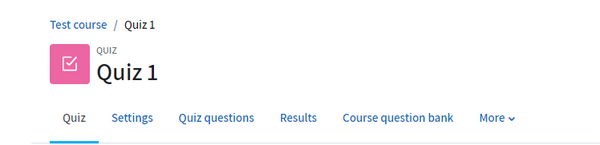
1. Enter the quiz by clicking on it's icon on the Course webpage.
2. Click on "Quiz questions" in the quiz top menu.

3. Click on "Add" and then choose "from question bank".

4. In the window that opens, click on the dropdown menu in the "Select a category" section and select the relevant category.

5. Check the questions that you would like to add to the quiz with a V.
To finish, click on "Add selected questions to the quiz".

When the test includes many questions, it is recommended to divide the questions into several pages.
If it is a limited number of questions (10-15 questions) it is recommended to present each question on a separate page.
At this stage you can perform the following actions:
A. Determine the "Maximum grade" for the test - it is recommended to keep the default of 100. Moodle calculates the quiz grade based on the "Total of marks" and the points awarded in each question.
B. Choose whether to "Shuffle" questions (each student will receive the questions in a different order)

B. Add a random question from a category
You can select a category from which each student will receive a random question. For example, if there is a pool of 50 questions in a category, and 5 were added as random questions, each student would receive 5 different questions from the category, randomly.
1. After entering the relevant quiz in the course menu, enter "Quiz questions". In the window that opens, click on "Add" and select "a random question".
2. In the "Category" section, choose the desired database (category) in the dropdown menu.
3. In "Number of random questions", choose how many questions from the category will be included in the quiz.
4. To finish, click on "Add random question".

5. Random questions in the test are marked with a cube icon.

At this stage you can perform the following actions:
A. Determine the "Maximum grade" for the test - it is recommended to keep the default of 100. Moodle calculates the quiz grade based on the "Total of marks" and the points awarded in each question.
B. Choose whether to "Shuffle" questions (each student will receive the questions in a different order)
Add images to the Quiz
When images are added to questions in the quiz, the image may not be displayed in full.
In this guide you will find instructions on how to set the image as a responsive image (an image that is displayed in a way adapted to the size of the screen).
How to add images to the quiz that adjust to fit the screen (responsive)?
1. Enter the "Course question bank".
Option 1: Click on "More" in the course's top menu. Then, click on "Course question bank".

Option 2: Through the quiz, click on "Course question bank".

2. Click on "Edit" next to the question with the image you want to make responsive (self adjustable).

2. Click on the image (the image will appear in blue).
4. Click on the image icon in the text editor.

5. In the "Image properties" window, check "Auto size" in the "Size" section.
6. Click on "Save image".

5. To finish, in the "Edit question" page, click on "Save Changes" on the bottom of the screen.
How to make sure that the image is responsive?
1. Enter the Quiz page.
2. Click on "Preview quiz".

3. Go to the relevant question through "Quiz navigation".

4. Reduce the size of the window by clicking on the panel icon in the corner of the browser.
5. You can change the window size by placing the mouse cursor at the edge of the window (the cursor is displayed as a double arrow), then clicking and dragging it.

Edit the Quiz pages
What's in the guide?
How to divide the questions in the quiz into pages?
To add or remove a page in the quiz pages, use the arrows next to the questions:
-
Clicking on the arrows pointing out creates a new page that separates the questions.
-
Clicking on the arrows pointing towards each other removes the page and merges the questions from the previous pages.

Add page
Remove page
How to add a section heading?
You can divide the test into chapters and give them a name by adding a section heading.
1. In the Quiz questions page, click on "Add" and then, click on "a new section heading".

2. Click on the pencil icon, type the desired section title and save by pressing Enter on the keyboard.

3. After the division into chapters, checking V in the "Shuffle" checkbox on the left will allow shuffling the questions only within the same section.

The section titles and the questions' order will be visible to the students in the quiz. If you are not interested in add a title, you can press the "space" button on the keyboard and press Enter to save. That way, the title box will be empty and the questions in the test will appear in sequence.
How to change the order of the questions?
You can change the position of the question by pressing the "four arrows" icon and dragging the question to the appropriate place.
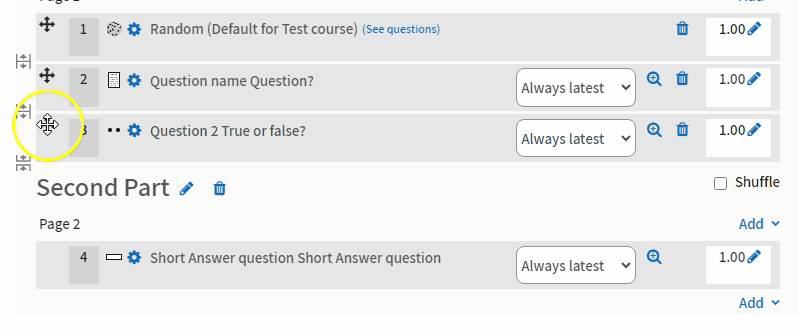
How to assign points to questions?
Updating points for a question is performed by clicking on the pencil symbol, typing the score for that question, and pressing Enter to save.
If all the questions have the same number of points (the default is one), they will have the same weight in the quiz final grade.

Add a password to the Quiz
Creating a password in the Quiz activity
It is possible to set a password in advance, so only the students will be able to enter the quiz activity.
How to set a password in a Quiz?
1. Enter the quiz you created.

2. Choose "Settings" in the quiz page top menu.
3.In the "Extra restrictions on attempts", click on "Click to enter text" and enter the password you want to set.
4. To save, press Enter on the keyboard.

5. Clicking on the "eye" icon will reveal the password.
6. Clicking on the pencil again will allow you to change the password.
It is important to remember to send the password to the students.
Print a copy of the Quiz
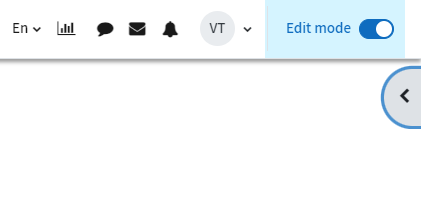
1. Enable "Edit mode" on the upper right corner of the page.

2. If the right-side menu is closed, click on the tab to open the menu.
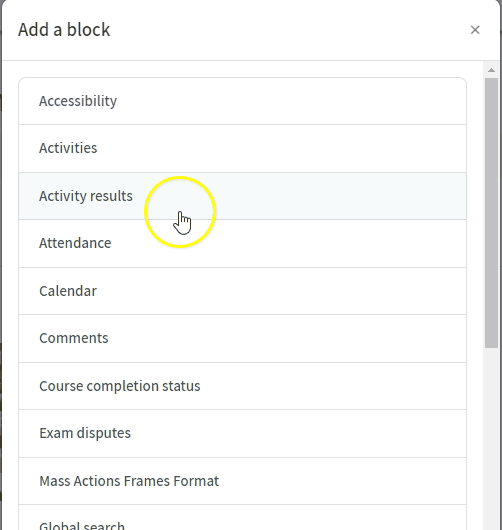
3. In the right-side menu, click on "Add a block".

4. In the window that opens, click on "Print exams".
5. A new block will be created on the right-side menu. If the right-side menu is not open, open it.

6. In the newly created block in the right-side menu, check V in the check box next to the quiz you want to print. Click on "Print" next to the name of the quiz.
Checking the box with a V means that the printed test will include the correct answers. Therefore, if you want the test to be printed without the correct answers, do not check the box with a V, only press the "Print" button.
7. The test will now be previewed.
To finish and confirm the print, scroll down and click on "Print" again.
