Adding time extensions for groups or specific students
In Assignment and Quiz activities, extended time can be allowed for groups of students or students individually. This must be done in advance for each test or assignment on the Moodle course website. In this guide we will explain the several ways how to do this.
What's in this tutorial:
-
Automatic sync of time extensions for eligible students
-
Set up automatic sync of time extensions in advance
-
Grant automatic time extensions on the day of the exam
-
Update time extensions during the exam
-
How students view the time extensions they received?
-
How to update the sync after changing the settings?
-
How to cancel extensions that have already been granted?
-
Frequently Asked Questions
-
-
Manual overrides
Automatic sync of time extensions for eligible students
In the "Quiz" and "Assignment" activities, a new function enables automatic sync of time extensions for eligible students. The extended time is synchronized according to the student's eligibility as recorded in University Student Management System (Mamta) and based on the time settings defined in the "Quiz" or "Assignment" in Moodle.
A time extension is an additional duration granted to students based on eligibility approved by the university (defined in Mamta).
For example: If a student is eligible for an extra 10 minutes per hour, in a quiz that lasts 90 minutes, the student will receive an additional 15 minutes, and the total quiz duration for that student will be 105 minutes.
In Moodle, eligibility data for automatic time extensions is updated nightly from Mamta.
Sync in a Moodle quiz can occur in two ways:
-
Programmed sync: If predefined, sync will occur at 06:00 on the exam start date.
-
Immediate sync: By using the "Sync now" button on the morning of the quiz and up until its end.
Set up automatic sync of time extensions in advance
It is possible to schedule sync up to one day before the exam date, provided that the opening and closing times have been defined.
1. Make sure that the quiz/assignment has defined start and end times (instructions for creating a Quiz/Assignment)
2. On the quiz/assignment page, in the green message box, click the link "Click here to sync time extensions".

3. On the next page, click the "Program auto-sync" button
A confirmation window will open: read the message and click "Confirm"

4. A confirmation will now appear on top if the “Program auto-sync” button, indicating that the automatic sync is set for a specific date.
At the bottom of the page, a log entry will appear documenting the action.

The sync will automatically take place on the day of the quiz at 06:00, granting extended time based on the current eligibility.
To cancel the scheduled automatic sync, click the "Cancel auto-sync" button.

How to confirm that the extensions were granted?
1. On the morning of the exam, after 06:00, enter the exam activity (Quiz/Assignment).
2. In the "User overrides exist" section, click on "Users".
Assignment Quiz


3. On the following page, a list of students who received extended time will appear.
For students who received automatic time extensions, the label "Auto-synced" will be displayed.
If you grant a manual extension to a student who is not listed as eligible in MAMTA, the extension will appear without the "Auto-synced" label.

Manual time extension
Auto time extension
4. To cancel the time extensions that were granted automatically, click the "Cancel auto-synced time extensions" button located above the table.

Grant automatic time extensions on the day of the exam
Immediate sync can be performed only on the exam day and until the scheduled closing time.
1. Make sure that the quiz/assignment has defined start and end times (instructions for creating a Quiz/Assignment)
2. On the quiz/assignment page, in the green message box, click the link "Click here to sync time extensions"

3. On the next page, click the "Sync now" button
A confirmation window will open: read the message and click "Confirm"

4. On the following page, a list of students who received extended time will appear.
For students who received automatic time extensions, the label "Auto-synced" will be displayed.
If you grant a manual extension to a student who is not listed as eligible in Mamta, the extension will appear without the "Auto-synced" label.
Manual time extension
Auto time extension
5. To cancel the time extensions that were granted automatically, click the "Cancel auto-synced time extensions" button located above the table.
Update time extensions during the exam
If the exam times were changed during the test, the time extensions must be updated accordingly
(For example: due to a delayed start, an additional of 20 minutes was granted to all students)
1. In the quiz/assignment settings, update the start and end time settings for all students and save the changes.
2. On the quiz/assignment page, in the green message box, click the link "Click here to sync time extensions".
3. On the next page, click the "Sync now" button.
A confirmation window will open. Read the message and click "Confirm".
The previous settings will now be overwritten, and the updated time extensions will be applied to the eligible students.
Important: Students must refresh their screens to see the updated time.
How do students view the time extensions they received?
Students will see their individual final submission deadline, which includes their extended time, rather than the time set for the rest of the class.
The same applies to time limits, if defined - they will see the duration allocated to them personally, not the general duration for the entire class.
Lecturer's view:

Student's view:

How to update the sync after changing the settings
If you modified the timing settings of the exam, the sync must be updated accordingly.
-
Before the exam date: On the quiz/assignment page, click the link "Click here to sync time extensions", then click "Cancel automatic time extensions", and click again on "Program auto-sync".

-
On the day of the exam (after 06:00): On the quiz/assignment page, click the link "Click here to synchronize time extensions", and then click the "Sync now" button (clicking this button will override the previous sync)

How to cancel extensions that have already been granted
1. On the morning of the exam, after 06:00, enter the exam activity (Quiz/Assignment).
2. In the "User overrides exist" section, click on "Users".
Assignment Quiz
3. On the following page, a list of students who received time extensions will be displayed, including details and the "Auto-synced" label
Manual time extension
Auto time extension
4. To cancel the extensions granted by the system, click the "Cancel auto-synced synchronized time extensions" button located above the table
5. On the next page, confirm the action

Now you will see only the overrides that were granted manually (if any exist)

Frequently Asked Questions
The "Program auto-sync" button is active only when both of the following conditions are met:
-
The exam has defined start and end times
-
The current date is up to one day before the exam
The "Sync now" button is active only when:
-
The exam has defined start and end times
-
It is the day of the exam and before the end time
The timing settings were changed but the extensions were not updated?
Cancel the automatic sync and activate it again (see link)
Some students have already received manual time extensions. What should I do?
Adjustments granted manually to an individual user:
• If the student is eligible for an extension in Mamta, the manual setting will be overridden after the auto-sync
• If the student is not eligible in Mamta, the manual setting will remain unchanged
Adjustments granted to a group:
• If there is a group member eligible for an extension in Mamta - the Mamta personal adjustment will be applied
• Group members who are not eligible in Mamta - the group adjustment remain without change
Manual overrides - Allow extended time for groups from Excel
The course staff can create new groups on the course website by uploading all the groups at once, from an Excel file.
After uploading the groups to the course website, extended time can be set for each group as needed.
Step 1 - How to prepare an Excel file with a list of students and groups?
1. Create a new Excel file.
2. Create a column of ID numbers titled "idnumber" (type in lowercase letters). You can use the downloaded list of students as a basis. Click here for the guide to download a list of students.

3. Create a column of the names of the groups titled "group" (type in the first line in lowercase letters).

4. Make sure that each line shows an ID number as well as a group name.
5. The columns must be copied from Excel. This can be done by selecting all the cells in both columns and copying them (Ctrl+C).
Step 2 - How to upload the Excel file to the course website?
1. Enter the course website.
2. Click on "More" in the main toolbar of the course. Choose "Groups" in the menu that will open.

3. On the screen that opens, click on "Enrolling participants - Paste from spreadsheet".

4. On the next screen paste (Ctrl+V) the columns in the Data box
5. In order to create the groups, click on "Enrolling participants to groups"

6. To finish, click on "Continue".


Groups in the course
List of students in the selected group
If the group in the Excel file already existed on the course website, the students will be added to the existing group.
If the group did not exist - a new group will be created and the students listed in the Excel file will be added to it.

+


7. In the groups page, on the left you can see the groups created, in brackets the number of participants in each group, and in the box on the right the names of the participants in each group.
Manual overrides - Allow extended time for groups created on the course website
Step 1 - Creating the groups on the Moodle course website
1. Enter the course website.
2. Click on "More" in the in the course's top menu. Then, click on "Groups".

3. On the page that opens, click on "Create group".

4. In the "Group name" field, type in the name for the new group (for example, "Group 1").

5. To finish, click on "Save changes" at the bottom of the page.
Groups can be added in this way as needed.
Step 2 - Adding students to the group
1. To add students to the group, mark the name of the group you created, which appears in the left table, by clicking on it.
2. Under the right table, click on "Add/remove users"

3. The names of the course participants will appear in the right block. Click on the names of the students you want to add to the group you created.
4. To complete the operation of adding them to the group, click on "Add".

New: To the right side of the display, you can see which groups the user is already a member before adding him to the intended group.
5. The names of the added participants will appear in the left table.
To leave the page, click on "Back to groups"

Manual overrides - How to allow extended time in an assignment or quiz to a group?
This guide includes how to define extended time for a group in a quiz or assignment, due to educational adjustments for example.
*In this guide, the examples refer to the "Quiz" activity, but it applies in the same way to the "Assignment" activity.
1. Enter the Quiz or Assignment activity on the course website.
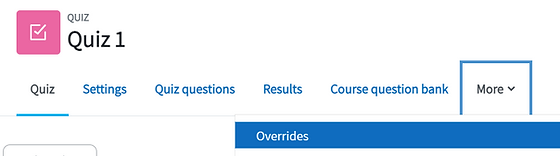
2. In the activity top menu, click on "More". In the menu that opens, click on "Overrides".
3. In the window that opens, click on the "Add group override" button.

4. In the "Override group" field, select the group to which you would like to give a time extension.

5. In the "Open the quiz", "Close the quiz" and "Time limit" sections, the times defined in the quiz settings for all students will appear.

Define the Quiz closing time according to the desired extended time:
The original end time + the defined time increment
6. It is advisable not to change the "Attempts allowed" section. If the group submitted the test and needs an additional answer (timeout/late start, etc.), the whole group can be granted another attempt.

7. To finish, click "Save".
8. After saving, you will see the group override in the quiz main page.

9. By clicking on the group override in the brackets, a new page opens. It shows the extended time granted to the group. It is recommended to make sure that the time set corresponds to the need.

Overrides must be set for each group separately
How to allow extended time in an assignment or quiz to a specific student?
In Assignment and Quiz activities, extended time can be allowed for specific students. This must be done in advance for each quiz or assignment on the Moodle course website. This guide includes how to define this for specific students, due to educational adjustments for example.
*In this guide, the examples refer to the "Quiz" activity, but it applies in the same way to the "Assignment" activity.
1. Enter the Quiz or Assignment activity on the course website.
2. In the activity top menu, click on "More". In the menu that opens, click on "Overrides".
3. In the window that opens, click on the "Add user override" button.
4. In the page that opens, in the "Override user" field, enter the student's username or ID number and click on his/her name in the box below.

5. In the "Open the quiz", "Close the quiz" and "Time limit" sections, the times defined in the quiz settings for all students will appear.
Define the Quiz closing time according to the desired extended time:
The original end time + the defined time increment
7. To finish, click "Save".
8. After saving, you will see the student override in the quiz main page.

Overrides must be set for each student separately