Iron Swords groups
The students entitled to academic adjustments due to the Iron Swords War are updated in the University's systems. These groups are present on the course sites in Moodle and activities can be defined according to these groups on the site. The groups in Moodle are automatically updated every morning according to the registration in the University system.
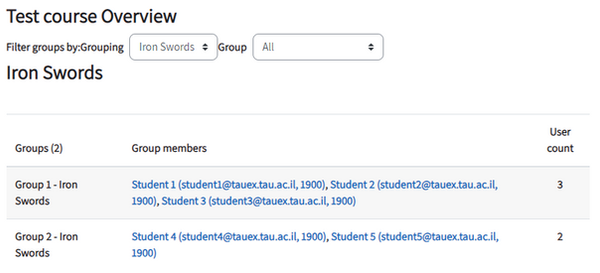
On each course site, in the first topic on the site, a link called "Iron Swords groups" was added, leading directly to the updated list of groups on the site.

When entering the link, the three groups and the students registered to them will be displayed.
To download the list of participants:
1. Scroll to the bottom of the page
2. On "Export users as" select "Microsoft Excel (.xlsx)".
3. Click on "Download".

In addition, in the "Participants" page, it is possible to filter by groups:
1. Click on "Participants" in the course menu.
2. In the “Match” field, select "Groups".

3. Select the group or groups you want to filter by.
4. Click on "Apply filters"

Send messages to a specific group
1. Enter the "Lecturer Messages" forum, then click on "Settings" in the menu at the top of the page.

2. Enter the "Common module settings" section. In the "Group Mode" field, choose the "Separate Groups" option.

3. In the "Grouping” field choose the "Iron Swords groups” option, for example.

4. To save your changes, click on "Save and return to the course”.
5. Go to the "Lecturer Messages" forum on the course website.
6. On the upper right side, select the drop-down list to whom you would like to direct the message to (all participants or a specific group).

7. Click on the "Add discussion topic" button, write a message and click on “Post to forum”.


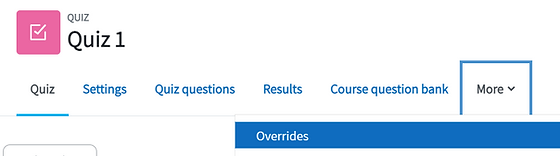
Allow extended time in an assignment or quiz to a group
In Assignment and Quiz activities, extended time can be allowed for specific groups of students.
1. Enter the quiz or assignment activity on the course website.
2. In the activity top menu, click on "More". In the menu that opens, click on "Overrides".
3. In the page that opens, click on the "User overrides" dropdown menu and select "Group overrides". To finish, click on "Add group override".

4. In the "Override group" field, select the group to which you would like to give a time extension.

5. In the "Open the quiz", "Close the quiz" and "Time limit" sections, the times defined in the quiz settings for all students will appear.

Define the Quiz closing time according to the desired extended time:
The original end time + the defined time increment
6. In the "Attempts allowed" section it is advisable not to change it. If the group submitted the test and needs an additional answer (timeout/late start, etc.), the whole group can be granted another attempt.

7. To finish, click "Save".
8. After saving, you will see the group override in the quiz main page.
9. By clicking on the group override in the brackets, a new page opens. It shows the extended time granted to the group. It is recommended to make sure that the time set corresponds to the need.


Overrides must be set for each group separately
Restrict access of a topic to students in a specific group
In each topic, access restrictions can be defined only for a group or grouping, so that any content on this topic will be available only to the group(s) participants.
1. Enable "Edit mode" on the upper right corner of the page.

2. Click on the three-dot button in the topic line, on the right side. Then, click on "Edit topic".

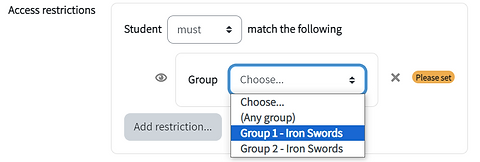
3. On the next page, click on "Restrict access" on the bottom of the page. Then, click on the button "Add restriction".

4. In the panel that opens, choose the restriction: "Group" or "Grouping".

5. In the page that opens, select the group that will have access to the topic.
The members of the group you choose will be the only ones who can see the topic content.
The "Add restriction" button adds a new restriction each time. Therefore, after each restriction is added, click "Save changes" at the bottom of the page.
6. Clicking on the "eye" icon next to the restriction hides the topic from the other students on the course website. If the eye is open, all the students will be able to see the topic and the restrictions.
The point of view of other students:


The topic is displayed on the course website with the restriction.
The topic is not displayed to other students.
Restrict access of an activity to students in a specific group
In each activity or resource, access restrictions can be defined only for a group or a grouping, so that this item will be available only to these students.
1. Enter the activity in which you would like to set an access restriction (the instructions refer to "Assignment" but are also suitable for resources, quizzes, and every other content).
2. Click on "Settings" in the activity top menu.

3. Scroll down to the "Restrict access" section. Click to open it, then click on the button "Add restriction".
4. In the panel that opens, choose the restriction: "Group" or "Grouping".
5. In the page that opens, select the group that will have access to the activity.
The members of the group you choose will be the only ones who can see the content or take part of the activity.
The "Add restriction" button adds a new restriction each time. Therefore, after each restriction is added, click "Save changes" at the bottom of the page.
6. Clicking on the "eye" icon next to the restriction hides the activity from the other students on the course website. If the eye is open, all the students will be able to see the activity and the restriction.
The point of view of other students:

The activity is displayed on the course website with the restriction.

The activity is not displayed to other students.