The video server
for the Faculty of Medicine and Humanities
Upload and publish recordings
If you don't see the video block, the side menu may be closed.
Click on the tab to open it.

Locate a video/recording on the course website
1. On the course homepage, in the “Video” block located in the right menu, click on the link “Course media”

2. In the page that opens, you can see all the course videos and recordings
-
Videos can be found by searching by filters, owner (who uploaded the recording) or by the dates of creation.
-
You can also sort the list of films by name, group, length, owner of the recording (lecturer, practitioner, teaching assistant) and the time the recording was created.

Where are the Zoom recordings made from the course website?
Recording of sessions scheduled and recorded through the Zoom activity on the course website in Moodle will automatically be available for you in the video server.
Please note: only sessions scheduled and recorded through the Zoom activity on the course website in Moodle will go directly to the course media.
Meetings recorded via Zoom outside the course website (through the app or the Zoom.us website) will not be transferred to the video server and will be stored in the Zoom cloud for up to 14 days.
Publish the recordings/videos of the course to students
As a default, the recordings are not available to students automatically.
To make a specific recording available for students:
1. On the course page, in the “Video” block located in the right menu, click on the link “Course media”.
2. On the page that opens, click on the “Add/Edit media” button

3. Now all the videos associated with you will be displayed.
Any video checked with a V is available for students in the course.
To make a video available in the course, mark a check V next to the video. When the desired videos are marked, click on the “Save” button.

To make the course recordings available to students automatically:
1. On the course page, in the “Video” block located in the right menu, click on the link “Course media”.
2. On the "Course media" page that opens, click on the “Automatic publish settings” button
3. In the next page, check V on the “Enable automation to publish my recordings in this course” field.
4. To finish, click on “Save”

Give editing and publishing permissions to additional users
Publishing permissions - granting publishing permission allows the user to see the video and add it into the course(s).
Editing permissions - granting editing permissions allows the user full permissions: both publishing permissions and video editing permissions, such as "rename", "change settings", and "delete".
1. On the course page, in the “Video” block located in the right menu, click on the link “Course media”.
2. On the "Course media" page that opens, click on the “Add/Edit media” button
3. In the next page, find the video for which you want to grant editing and/or publishing permissions and click on the wrench icon.
4. In the next page, you can add “Co-Publishers” or “Co-Editors” by searching the user’s university email address. To finish, click the “Save Changes” button.

Upload a video from your computer to the course's video file directory
1. On the course page, in the “Video” block located in the right menu, click on the link “Course media”.
2. On the "Course media" page that opens, click on the “Add/Edit media” button
3. In the next page, click on “Upload”

4. In the page that opens, name the video and drag the video to the “File” field. To finish, click “Save Changes”. If you don’t name the video, the video server will use the file name as the video name. You can also upload audio files and not just videos.

5. The video will appear immediately in the media list, and in the first moments when the system processes it, a message will appear: “Uploading...”

6. When the video is ready, it will appear checked with a V at the top of the list.
7. If you want to hide the video from the students, remove the V on the "Add/Edit media" page. To finish, click the “Save” button above.
Create a playlist
1. On the course page, in the “Video” block located in the right menu, click on the link “Course media”.
2. On the "Course media" page that opens, click on the “Add/Edit media” button
3. In the next page, click on “Create playlist”
4. Name the playlist, and if necessary, write a description.
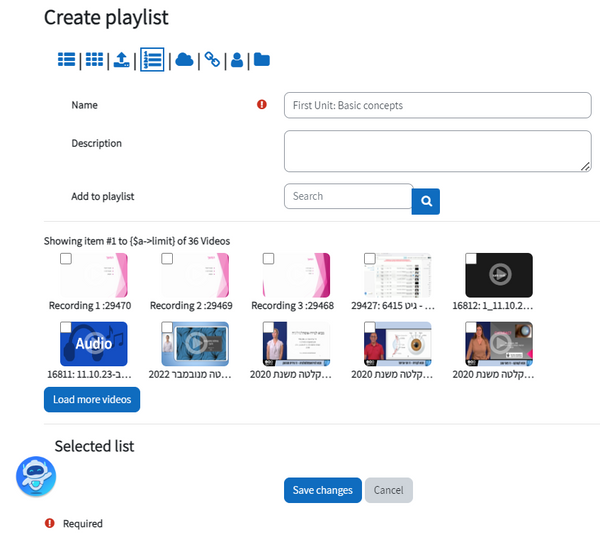
5. Choose the videos that will be included in the playlist from the list of videos that will be displayed: mark V in the upper left corner of the selected videos. Click on “Load more videos” if not all videos are displayed.
To finish, click on “Save Changes”.
6. The list of selected movies will be displayed below.
You can change the order of the videos by dragging using the four arrow icon
You can also cancel adding one of the videos to the playlist by clicking on the X to the left of the video
7. To finish, click on “Save changes”

8. Now the playlist you created will also appear in the list on the "Course media" page. In playlists, in the “Length” column you will see the number of movies that make up the playlist instead of the duration of the video and in the “Commands” column you will see the movie list icon

Embed a video into the course website
1. On the course website, turn on the “Edit mode” (in the upper right corner of the website).


2. Click on “Add resource or activity” in the topic of your choice.

3. In the window that opens, select the “Videostream” option.

4. In the next page, name the video and, if necessary, add a description or prompt in the
“Description” field.

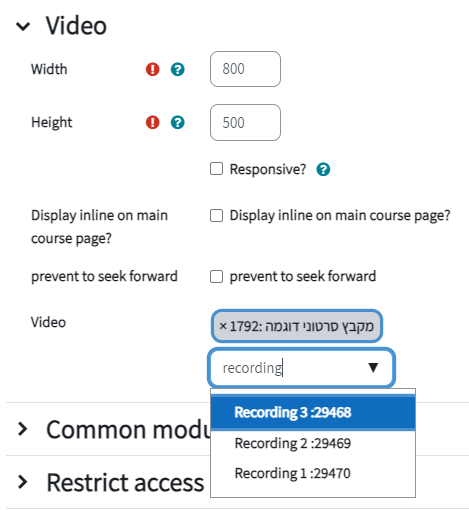
5. For the video to be displayed openly on the course page, check off the “Display inline on the main course page” field (If unchecked, a link to access the resource will be displayed).

6. In the “Video” section, select the video you want to embed. Clicking on the arrow in the search menu will display the list of videos. You can also find a video by typing its name.
7. To finish, click on “Save changes and return to the course”
8. This is how the video will look when embedded on the course website:

A video that is embedded with the setting “Display inline on the main course page”
When “Display inline on the main course page” is not checked
Display a video in an H5P interactive video
Step 1: Copy the video link
1. On the course page, in the “Video” block located in the right menu, click on the link “Course media”.
2. On the "Course media" page that opens, click on the “Add/Edit media” button
3. In the next window, find the video you want to use and click on the wrench icon
4. In the page that opens, copy the link shown at the bottom of the page on the left, then click on "Save changes".

Step 2: Creating an H5P activity and adding the link
1. On the course website, turn on the “Edit mode” (in the upper right corner of the website).
2. Click on “Add resource or activity” in the topic of your choice.
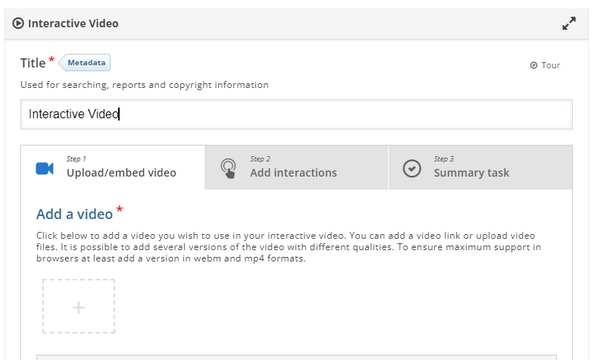
3. In the page that opens, select the “Interactive Content” activity

4. In the “Editor” field, select the "Interactive Video" option

5. Name the video and click on the gray plus sign to add it
6. In the page that opens, paste the link copied in step 1 and click the “Insert” button

7. To finish, click “Save changes and return to the course”
How do you edit a video or recording using the video server?
In the video server there are 3 options of video editing: crop, cut, and concatenate. It is possible to choose only one at a time. After finishing the editing of the video, you can return to the edited copy and perform another editing action.
1. On the course page, in the “Video” block located in the right menu, click on the link “Course media”.
2. On the "Course media" page that opens, click on the “Add/Edit media” button
3. In the next window, find the video you want to use and click on the pencil icon
Crop videos
It is possible to select a specific part of the video screen and resize the recording. After editing the video, you can return to the edited version and perform another action.
1. Click on the “Crop Video“ icon

2. Click the video screen to start selecting the area. By moving the mouse, a red frame will appear, showing the selected area. A second click will finish the selection process. If you want to change the selection area, repeat the operation.
3. In the “Save“ field, choose “Save“ or “Save as a new copy“.
Save = The edited copy will update the original copy and be saved in the same file (overwriting it).
Save as new copy = the edited copy of the video will be saved separately to the original copy.
4. To finish, click “Save changes“.
5. On the next page, the video will appear. While the server is processing the changes, the video will show as "Uploading". The operation may take a few minutes.

Cut videos
This option allows you to cut one or both ends of the video (the beginning and/or the end) or to cut any part during the video. After editing the video, you can return to the edited version and perform another action.
1. Click on the “Cut video“ icon

2. Using the video's timeline, stop the video at the point you want to cut it at.
3. In the “Choose start point“ bar, click on “Copy video value“. The blue dot will match your selection in the video.
4. Stop the video again at the end of the segment you want to cut, or move the timeline button to the relevant position.
5. In the “Choose end point“ bar, click on “Copy Video value“. The blue dot will match your selection in the video.
6. Now choose what you want to cut:
Remove video sides = the beginning and the end of the video
Remove middlepart = the segment between the two positions you selected.

7. In the “Save“ field, choose “Save“ or “Save as a new copy“.
Save = The edited copy will update the original copy and be saved in the same file (overwriting it).
Save as new copy = the edited copy of the video will be saved separately to the original copy.
8. To finish, click “Save changes“.

Concatenate (combine) videos
This allows you to combine two videos and create one merged video. After editing the video, you can return to the edited version and perform another action.
1. Click on the “Concatenate videos“ icon

2. In the “First video“ dropdown list, choose the first video and in the “Second video“ dropdown list, choose the second video to be combined.
3. To finish, click on “Save changes“

4. On the page that opens you will be able to see a message at the top of the page updating that "Your request is in work...“
To finish, click the “Back“ button

5. On the next page, the video will appear. While the server is processing the changes, the video will show as "Uploading". The operation may take a few minutes.