Audio-Visual Support

This guide includes:
Turning off sound when participant joins or leave
1. Enter the Zoom meeting.
2. Click on "Participants" in the toolbar

3. Press the three dots button

4. Remove the check sign next to the "Play sound when someone joins or leaves" option by clicking on it.

Turning off/on the microphones of all participants
Participants can turn off their microphones during the meeting at once using the "Participants" button. You can choose whether to allow the participants to open the microphone independently or not, after clicking the "Mute All" button.
Turning off participants' microphones during the meeting
1. Enter the Zoom meeting.
2. Click on "Participants" in the toolbar
3. Click on "Mute All"

4. Remove the check next to the sentence "Allow Participants to Unmute Themselves", in case you want the participants to not be able to open the microphone for themselves.
Otherwise, leave the check mark so that the participants can control their personal microphone.
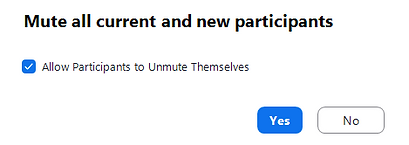
5. Click on "Yes"

Enabling participants to turn on their microphones
1. Click on "Host Tools" in the toolbar
2. Check the sentence "Allow participants to unmute themselves", in case you want the participants to be able to control the personal microphone and open it for themselves.

Filtering background noise during a meeting
You can reduce background noise (such as dogs barking, typing, etc.) during the Zoom meeting by changing the microphone settings.
There is a default background noise reduction, but the level of filtering can be adjusted based on need and environment.
1. Enter the Zoom meeting.
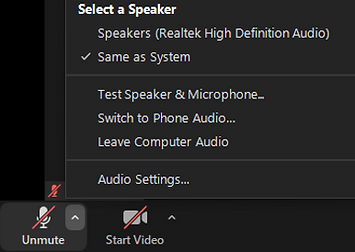
2. Click on the button next to the microphone button in the toolbar
3. In the window that opens, select "Audio Settings..."
4. Under "Audio Profile", in "Zoom Background noise removal", choose the level of noise filtering you want Zoom to activate, by checking the circle next to the options: Auto, Low, Medium, or High.

5. The changes made will be saved automatically.
Closed Captions
Automatic Closed Captions create subtitles for a live Zoom meeting. When enabled, participants can individually read and scrolls through the subtitles; however, participants cannot download or copy the subtitles.
Subtitles increase accessibility, as well as provide students with the option of going back if needed. Subtitles also help lecturers with easily creating lesson summaries, as Hosts are the only ones allowed to download the transcript document.
Note: The closed captions automatically move to the Panopto recording, and each viewer can choose whether to turn them on or off.
However, it is important to note that automatic transcripts might still include mistakes, and so it is essential to check the transcripts of Panopto recordings.
1. Go to the Zoom website, and click on "My Account"
2. Click on "Settings" on the left-hand menu and select "Meeting"
3. Scroll down to "In Meeting (Advanced)" and turn on "Automated captions"
4. Ensure that "Allow only of the following users..." is ticked, with "Host + Co-Host" selected

5. In the Zoom meeting, click on "Show captions" in the lower toolbar.
5. In the Zoom meeting, click on "Show captions" in the lower toolbar. To access the settings, click on the icon next to . There you can change the language, the font, and the position.


Downloading the transcript
1. On the Zoom website, select “Recordings and Transcripts” on the left-hand menu, and select the recording.
2. Click on "Closed Caption" ולחצו על הורדה (אייקון החץ )

A vvt file will be downloaded and opened. To open the file without an editing software:
3. Right-mouse click on the file
4. Click on "Open with"
5. Choose "Notepad"
(3)

(4)
(5)
Editing closed captions on Panopto
1. Locate the video on Panopto
2. Click on the editing icon

3. On the left-hand menu that opens, click on "Captions"
4. Play the video
5. When reaching the part where the subtitles need to be edited, select the captions on the left and update the text accordingly
6. To delete a line, place the cursor on it, click on the three dots and choose "Delete"
7. Click "Apply" on the upper-right corner

(3)
(4)
(7)
Disabling subtitles on Panopto
1. Locate the video on Panopto
2. Place the cursor on the video and click on the Settings icon

3. In the window that opens, click on the "Captions" tab.
4. Click on the triangle to open the "Available Captions" field.
(3)

(4)
5. Click on "Delete Captions".

6. Click "OK" to verify the deletion of captions.

Note: After deleting the captions, it is impossible to retrieve them automatically. It is therefore recommended to keep a back-up of the captions.
Adding a virtual background in Zoom
1. Enter the Zoom meeting
2. Click on the button, next to Video at the bottom of the screen

3. Choose one of the following options:
-
To blur the background, keep the default selection "Blur my background"
-
To choose a virtual background, choose "Adjust background & effects"

4. Clicking on the button enables adding a virtual background of an image or a video clip from the computer, or only blurring the background through "Blur".

5. Clicking on one of the backgrounds provided changes the background.
Clicking on "None" stops the use of the previously chosen virtual background.
Changes are automatically saved and immediately presented in the Zoom session.
Improving your video display
You can improve the quality of your video - how participants see you - by changing the camera settings within the Zoom session.
1. Enter the Zoom meeting
2. Click on the arrow button next to Video in the toolbar

3. Select the option "Video Settings..."

4. Under "Camera", marking V in the "Touch up my appearance" field opens a scale that simulates a cosmetic filter of the participant's face.

5. Dragging the button to the right will allow softening of face features and dragging the button to the left will allow highlighting details on the face
6. Turning on the "Adjust for low light" field will open a drop-down menu, with which you can control the brightness of the screen manually. In addition, "Portrait lighting" brightens the participant's face.

7. After the update, the changes are automatically saved and displayed immediately in the Zoom session