Before Meetings

This guide includes:
Obtaining a University Zoom license
To schedule Zoom meetings through Moodle without a time limit, you must obtain a university Zoom license. The Zoom license is created on the course website for users whose email address is XXX@tauex.tau.ac.il.
1. Enter the Zoom resource, which appears on the course website, under the "Announcements" (if it does not appear, you can add via "add resource or activity").


Does a Warning message appear?
Fill out the form in this link to report and fix the issue.
Does a green message appear?
After the first login to Zoom, you will receive an email in the email address connected to your Moodle user account (the address that appears on the screen).

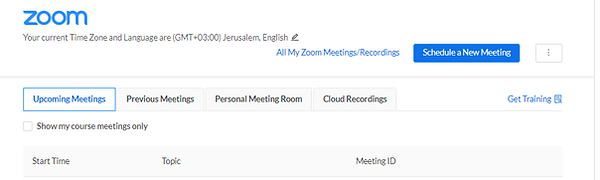
2. If the screen with the "Schedule a New Meeting" button appears, continue to the next step - click here to continue.

How to activate your University Zoom account?
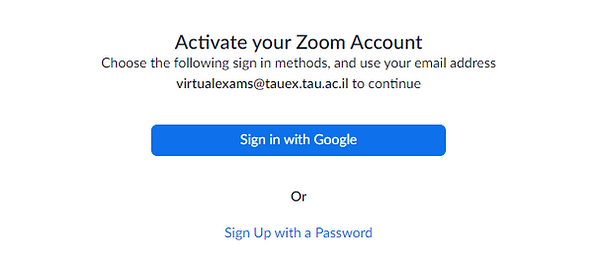
1. To activate, login to your University email address and open the email received from Zoom with the subject “Zoom account invitation”.
2. Click on “Activate Your Zoom Account” and choose “Sign Up with a Password”.


3. Fill in your details and set a new password (does not need to be the same as in Moodle) and click on "Continue".
The password must contain the following characters:
-
At least one uppercase letter
-
At least one lowercase letter
-
At least one number
-
It cannot include identical characters (aaaaaa) or a sequence (123456)

4. On the new page you can go to the Zoom settings via the “Go to My Account” button

Type of Zoom License
In order to hold a Zoom class properly (with no time limit) and share the recordings in the video server, you must make sure that you have a type of university license. University license type is Licensed (not Basic).
How to check the Zoom license type?
1. Enter the Zoom website.
2. Click on the "Sign In" button, to connect with the personal university account
3. Connect with the email address of the Moodle account and with the personal password of the Zoom account. If it is your personal device, you can check off "Stay signed in".

4. Click on "Profile" in the menu on the left

6. If Enabled appears in the "License" line - you have a University license.

Updating the Zoom software
Zoom regularly updates to new versions in order to add new features and fix bugs. The recommendation is to upgrade to the latest version as soon as it is available.
1. Enter the Zoom software installed on the computer

2. Click on Sign In to connect to the personal university account

3. Enter your login information (email address and password) and click "Sign In".

4. Click on your initials in the upper right part of the screen
5. Click on Check for Updates to search for advanced versions

6. Click on Update

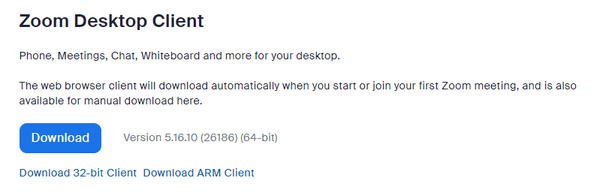
Updating Zoom via a link
2. Click on Download found in the Zoom Client for Meetings slot
3. Click on the downloaded file located at the right top of the screen

4. Finally, the update will start downloading.

Scheduling Zoom meeting(s)
As a default, all meetings scheduled through your University Zoom account are automatically recorded.
Only meetings scheduled and recorded through the Zoom activity on the course website in Moodle will go directly to the video server on the course website.
Meetings recorded via Zoom outside the course site will not be transferred to the video server and will be stored in the Zoom cloud for up to 14 days.
How to schedule a Zoom meeting in Moodle?
1. Enter the Zoom activity on the course website (if it does not appear, you can add via "adding a resource or activity", for instructions click here).

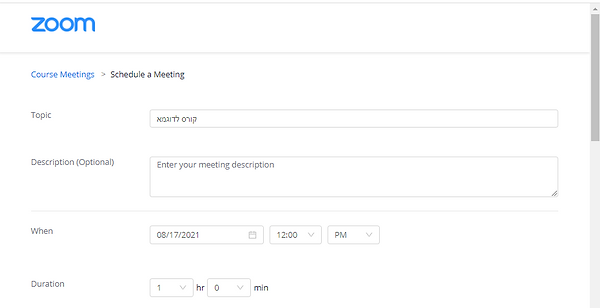
2. In the "Zoom" window that opens, click on "Schedule a New Meeting"
3. In "Description" you can write a description/instructions for the meeting
4. In "When" define the date of the meeting - start date and time
5. In "Duration" define the duration of the meeting
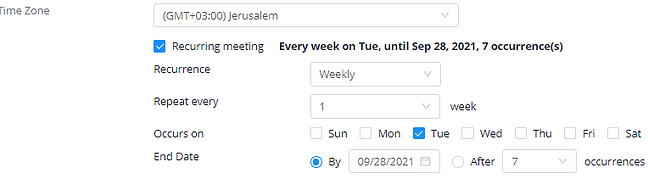
6. Mark V in the "Recurring Meeting" field in order to define recurring meetings (every day, every week, every month or without a specified time).
After checking, the following options will open:
-
Recurrence - the frequency in which the classes are held. For example, Weekly if the meeting takes place once a week.
-
Repeat every - the number of weekly meetings (for example, when 1 is marked, it means: meeting repeats every week)
-
Occurs on - mark which day/days the meetings take place.
-
End date - Mark the date of the last meeting of the course (until a certain date or the determination of the total number of meetings).
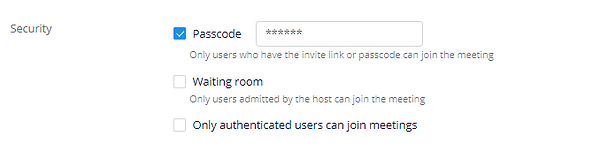
7. Security - To secure the meeting, you can set a password for the meeting (Passcode) by marking V in the relevant box. If a password has been set, it is important to send it to the students along with the link to the meeting.
8. To record the meeting in the cloud automatically, mark V in the "Record the meeting automatically in the cloud" option.
9. To add another user as a host in the meeting, you can type in the "Alternative hosts" section an email address of a university account.
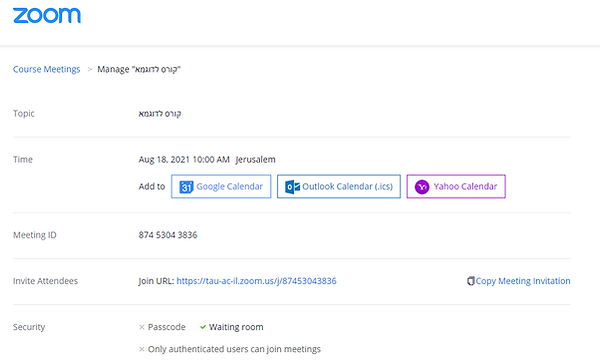
10. To save the settings and receive a link, click Save

11. After clicking Save, the meeting details will be displayed
It is recommended to send the meeting link to students in advance. Continue for instructions.
Sending the meeting link to the students
1. After saving the meeting, scroll the screen up until the meeting link appears and click on "Copy Meeting Invitation"

2. Return to the main page of the course and click on "Announcements"

3. Click on "Add discussion topic"

4. In the subject of the message, type a title, for example "Our Zoom Classes"

5. Paste the link or invitation copied from the zoom page by pressing Ctrl + V on the keyboard, or right-clicking on the mouse and selecting Paste

6. Now you can see the message that includes the meeting details in the "Message" box
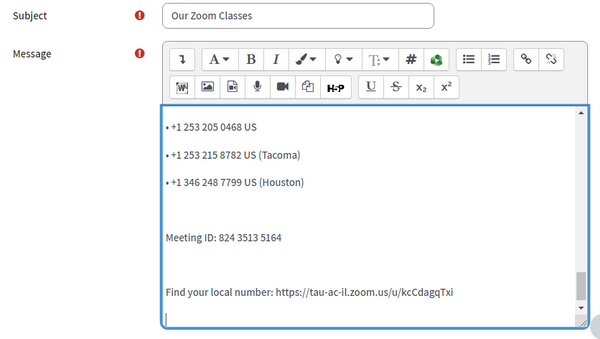
7. Highlight the Zoom link and copy it, by pressing Ctrl+C

8. Click on the link button
9. Paste the copied Zoom link and click on "Create link"

Optional
1. Checking off the "Send forum post notifications with no editing time delay" option enables sending a message immediately instead of a 5 minute delay.

2. To finish, click on "Post to forum" in order to publish the message.
Recommendations for preparing a lesson
Only meetings scheduled and recorded through the Zoom activity on the course website in Moodle will go directly to the video server on the course website.
Meetings recorded via Zoom outside the course site will not be transferred to the video server and will be stored in the Zoom cloud for up to 14 days.
1. Make sure that there are no windows/software open on the computer which you will not use in class. For example, close the email, Facebook, WhatsApp web, etc.
2. Open in advance the programs/websites that you would like to present during the lesson.
For example - the lesson presentation, videos, software you want to show and so on.

3. Make sure the network connection is stable. Also, prefer a wired connection over WIFI. A weak network connection will cause disruptions during the meeting.
4. Try to conduct the lesson in a quiet place. You can filter noises in Zoom using the guide from Zoom support.
5. It is recommended to check the soundness of the speakers, the microphone and the camera before starting the lesson
6. In a lesson where you want to share a video clip, it is suggested to use a video clip that is saved on the computer and in high quality - click here for a guide on how to optimize a shared video.
Remember, if the video is of low quality on the PC, then its transmission will also be of low quality and sometimes even more so.
7. It is recommended to blur your background or add a virtual background.
Automatically recording a specific meeting
1. Enter the course website in Moodle
2. Enter the Zoom activity

3. In the window that opens, click on the "Schedule a New Meeting" button

4. On the page that opens, scroll to the end of the page.

5. Make sure that the "Automatically record meeting" section is checked so that the meeting is recorded automatically. In case it does not appear, check off the box next to "Automatically record meeting".

6. Click the Save button to save the settings.

Recording a meeting on the personal computer instead of the cloud
There are several limitations in recording to the personal computer instead of to the cloud:
-
In recording to the personal computer, the names of the participants will not appear
-
It is not possible to record audio, shared screen and the speaker's video panel separately
-
It is not possible to record on your mobile device or tablet
1. Enter the Zoom website
2. Click on "Sign In" or "My Account", to connect with the personal university account


3. On the left-hand menu, click "Settings"
4. Click on "Recording"

5. To "Record to computer files", press the button to change its color to blue

6. Enter the Zoom meeting and click "Record" on the lower toolbar.

7. Select the option of recording the meeting on the personal computer by clicking the "Record on this Computer" button.

8. At the end of the meeting, Zoom will save the recording on the computer by converting it from a Zoom file to a video file.

9. After the process is finished, there will be access to the Zoom folder where the recording folders will appear.

10. Click on the relevant folder, with the date of the Zoom meeting.
11. Inside the folder several files will appear called Zoom_1.mp4, Zoom_0.mp4 and more. Click on them and the recording will be played in the player installed on the personal computer.
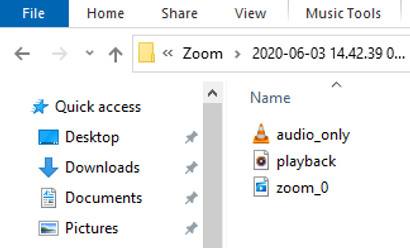
Participants don't have permission to record the meeting, unless the Host enables it through the "Host tool" panel.

