During & After Meetings

This guide includes:
Starting a meeting
1. Enter the Zoom activity on the relevant course site in Moodle.
2. Click on Start next to the relevant meeting

Managing a meeting
At the beginning of the meeting, it is recommended to check the following actions:
-
The meeting is recorded in the cloud (for instructions on recording a meeting, click here)
-
The camera is on (pressing the Video button)
-
The Chat window and the Participants window appear on the screen
-
Going over the Host tools options according to the needs of the lesson
-
Decide whether the recording will include a video of the speaker only, and if so set Spotlight for Everyone.


1

Participants
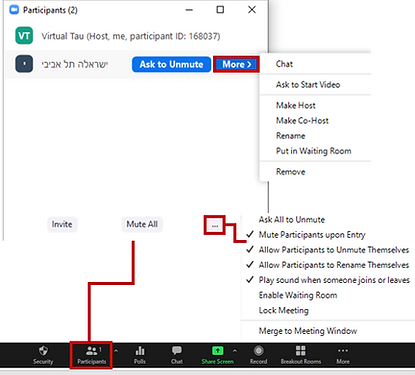
Clicking on the "Participants" button allows you to see the number of participants in the meeting.
The number that appears in brackets represents the number of participants (including the host)
-
You can control the permissions granted to each participant individually
-
General permissions can be controlled
2

Chat

Clicking on the "Chat" button allows you to correspond with all participants in the meeting and also with individual participants individually. In the chat you can send text, icons (Emoji) and files.
Note: It is possible to block the sending of messages or limit the sending of messages for the host and co-host only
3

Share Screen
-
Clicking "Share Screen" allows you to share your computer screen (or certain windows).
-
You can share a single window or the entire screen.
-
After selecting the desired option, click on the Share button
Choose how the speaker will be seen while sharing the screen

Share the sound played on the computer
Share a video from the computer
If you use two screens, you can select the option to share both screens and then you will be able to switch between them while sharing the screen. For this purpose choose: Hold Ctrl on your keyboard to select the screen in the top row
4
Record
Clicking the Record button will start the recording of the session. To make sure the meeting is being recorded, you can see that the Record button has changed to Pause/Stop Recording. Also, a recording icon appears in the upper left corner of the session.

All recordings are automatically saved in the Zoom cloud of the user account (unless otherwise defined) and go to Panopto automatically.
Setting the recordings to be saved on the computer:
-
Go to https://zoom.us/
-
Sign in to your Zoom account
-
Click on My Account
-
Click on Settings on the left-hand menu
-
Go to the Recording tab in the top menu and scroll down to the "Automatic recording" field
-
Select "Record to Computer"

Participants can change username in the meeting
Creates a waiting room
Participants can share a screen
Participants can activate cameras

5

Participants can share Whiteboards
Participants can use apps from Zoom Marketplace
Participants can record meeting to their computer
Participants can request the meeting will be recorded to the cloud
Security
Locks the meeting so that additional participants cannot enter the class
Hides the profile pictures of the users
Participants can correspond in chat
Participants can turn on microphones
Participants can share Notes
Participants can set a time for the meeting
Participants can request the meeting will be recorded to their computer
Participants can share Docs
Participants will not be able to: turn on cameras and microphones, write in the chat, share the screen and draw on the screen)
Spotlight for Everyone setting
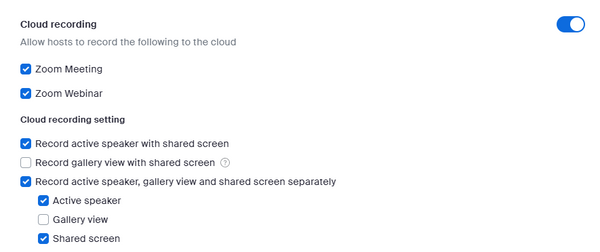
Zoom will only record the speaker/presenter by choosing Spotlight for everyone. This is only possible if the speaker's camera is turned on, and at least 3 participants have joined the session.
Note: To record this way, you must ensure that in the session's settings, only "Active Speaker" is selected and not "View Gallery".
-
Go to the Zoom website
-
Click "Settings" on the left-hand menu
-
Click "Recording" from the upper menu
-
Scroll down an enable "Cloud recording"
-
Uncheck "Gallery View"
Recording the session without the participants' video
1. Enter the Zoom session
2. Click on "Video" in the tool bar to turn on the camera
3. Click on the 3 dots in the corner of your personal window.
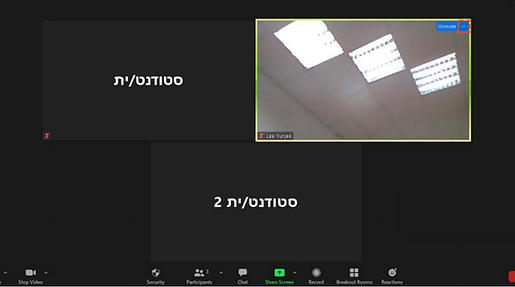
4. Click on "Spotlight for everyone".

Only when there are 3 or more participants can the Spotlight for Everyone be enabled in the Zoom session.
Checking the recording of meeting during the meeting
1. Enter the Zoom meeting
2. There are three ways to make sure the meeting is recorded:
A. The recording icon should appear on the upper left side of the screen. If it does not appear, the meeting is not being recorded.
B. In the toolbar at the bottom of the screen, if the "Pause/Stop Recording" button is visible, the meeting is being recorded.
C. If the "Record" button appears instead of the Pause/Stop Recording button, the session is not recorded. Press the button to start recording.
If the following option appear, choose "Record to the Cloud".

Sharing high quality video sharing from the computer
With this option, video files can be opened from Zoom's built-in video player and shared, without other participants seeing the playback controls.
Sharing the video in this way will improve the quality of the viewing experience of the participants.
*This button is available for use starting from version 5.4.3
How to share video files in a Zoom meeting?
1. Make sure that the university Zoom account is connected in the Zoom application on the computer - click here for a reminder on how to connect to the application.
2. Update the Zoom software to a version that is at least above 5.4.3 - click here for a reminder on how to update a version.
3. Enter the Zoom meeting
4. Click on the "Share" button on the toolbar
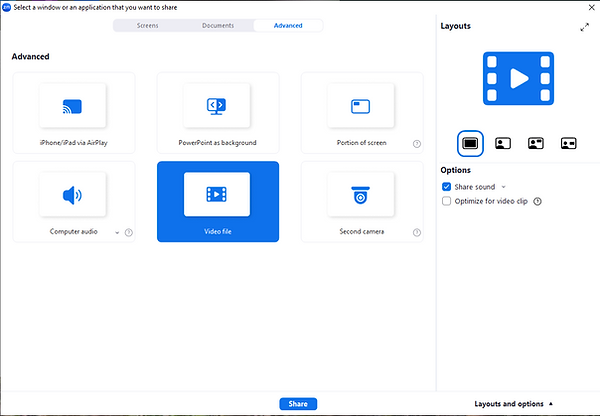
5. Click on "Advanced”
6. In the next screen, click on "Video file"

7. If you share a video file, make sure that both sections are checked: "Share sound" and "Optimize for video clip" and to finish click on "Share".
To share a sound file, remove the tick from the section: "Optimize for video clip"
8. In the pop-up window, choose from your computer the video you want to share or write the name of the video you were looking for.

9. If you have chosen to optimize the video, a message will pop up in the upper right corner informing you that the video images of the participants have been minimized in order to display the video in full screen mode, for optimal viewing.

10. After sharing the screen, if you wish to change the settings of the video or stop sharing it, you can do so from the My video file located at the top of the screen, by clicking on the 3 dots.

11. You may be asked to install a plugin for sharing video files. Confirm the Zoom request and it will be done automatically. If prompted to install, you may need to click "Share Screen" again after the plugin is installed.

Accessing the meeting attendance report
It is possible to get a report of the participants who attended the course Zoom meeting from the Zoom on the Moodle course website or from your account page in the Zoom website.
You can also download the list to an Excel file. The list contains the following information: the names of the participants, join times, leave times and length of stay during the meeting. If a participant has entered and exited several times, he will appear several times in the list.
1. Enter the Zoom resource on the Moodle course website

2. In the next page, click on the tab "Previous Meetings".
3. Select the meeting for which you would like to receive the list of participants and click Report.

4. In the window that opens, you can see the names of the meeting participants, their email addresses, their entry and exit times, and the duration of their stay in the meeting.
You can also export the report to a CSV file.

The report contains the names of the participants, but sometimes we see duplicate names. This happens because ZOOM records every login, so if a participant logs in, logs out, and logs back in, we'll see their name multiple times.
Downloading a recording to a computer
Zoom sessions that are saved on the cloud are backed up within hours to the Panopto video server.
Two weeks after the date of the session, the recordings will be deleted from the Zoom cloud and will no longer be available.
In order for students to access the recordings from the course website, they must be made available. Click here for instructions.
This guide explains how to save recordings from the Zoom cloud and not Panopto.
1. Access the Zoom website
2. Click on "Sign in" or "My Account" to log in with your personal university account.


3. Click on "Recordings".

4. This page displays a list of all recordings that are saved on the cloud (up to two weeks from the day of recording).

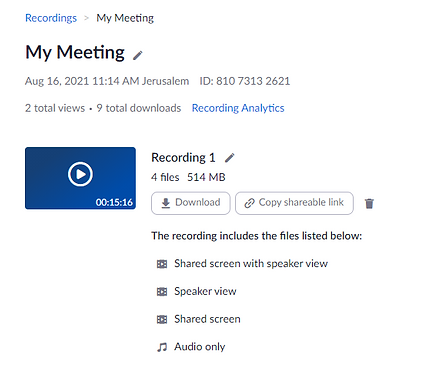
5. Click on the title of your intended lecture (for example, "My Meeting"). You can identify the date of recording through the column "Start Time".
If the recording is still being processed, a notice "Processing Recording" will be displayed.
6. To download the recording to your personal computer, click on "Download".